
Agenda:
In this article, we will create a .net core microservice and create a code first database using entity framework 3.1.
Pre-requisite:
- Visual Studio 2019
- .NET Core 3.1 SDK
A microservice is a HTTP based service that is responsible for a specific business logic and has a single responsibility. It is known as micro, as it has its own database, which is independent of other databases. This makes it loosely coupled and easy to maintain.
Entity framework core
is an Object Relational Mapping (ORM) provider that allow almost all database operations without writing any .net related code to perform those operations with database. It has inbuilt methods and features that makes for the easy development by Asp.net MVC developers.
Let’s go to the demo and see this in action.
-
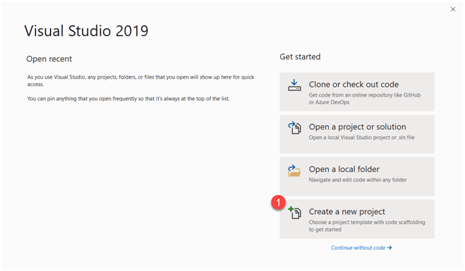
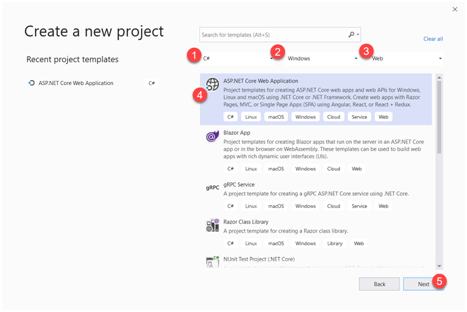
Step 1 Create a new project in Visual studio 2019 with .NET Core 3.1 API template as shown in the screenshots below.


-
Step 2 Once the project is created, install Entity Framework Core Nuget packages from the Nuget package manager.

We need to install 3 packages to achieve our task.
-
1. Microsoft.EntityFrameworkCore – This will allow all the features of EF Core in the project.

-
2. Microsoft.EntityFrameworkCore.SqlServer – This will allow us to inject the SQL server connection in the project pipeline

-
3. Microsoft.EntityFrameworkCore.Tools – This will allow us to use a command to perform operations on the hire SQL server.

Once you install all these 3 packages, they should be visible as below.

-
-
Step 3 Since we used API template to generate this project, there should be a WeatherForecastController.cs and WeatherForecast.cs files in the project. Remove them.

-
Step 4 Now, we need to create a class with the name Customer which will contain the properties that represent a customer object.
Create a folder with name Entities and create a class file with name Customer.cs.

using System; namespaceCustomerMicroserviceWithEFCore.Entities { publicclassCustomer { publicint Id { get; set; } publicstring Name { get; set; } publicDateTimeDateOfRelationship{ get; set; } publicbool Status { get; set; } } } -
Step 5 We have created our customer entity. Now we need to create a database context that will generate Customers table.
Create another folder in the project root and name it as DBContexts. Create a class file with name CustomerContext.cs. Add the following code to it.


usingCustomerMicroserviceWithEFCore.Entities; usingMicrosoft.EntityFrameworkCore; namespaceCustomerMicroserviceWithEFCore.DBContexts { publicclassCustomerContext :DbContext { publicDbSet<Customer> Customers { get; set; } protectedoverridevoidOnConfiguring(DbContextOptionsBuilderoptionsBuilder) { optionsBuilder.UseSqlServer($"Server=YourServerName\\SQLEXPRESS;" + $"Database=CustomerDatabase;" + $"Trusted_Connection=True;" + $"MultipleActiveResultSets=true;" + $"ConnectRetryCount=0"); } } } In the code above, we are creating a DbSet of Customer object so that we can get all the data in the Customers Table.
Since we are using code first approach, we are overriding a predefined method known as OnConfiguring which creates the database when we first configure the microservice.
-
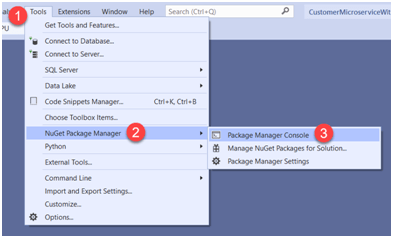
Step 6 Now go to the package manager console and let’s create database migrations.
-
Step 7 We need to first add the migration using the command “add-migration initial”.
In this command, we are adding a migration with name initial. Name can be anything that you want.
-
Step 8 Once you do that, you need to update the database using command “update-database”. This will update the database with the migration.

A folder with name migration will be automatically created so that you have a history.

-
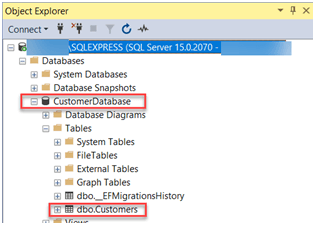
Step 9Let’s check our SQL server database if this table is created or not.
-
Step 10 Let’s add some dummy data to the database table and then we will try to retrieve that data from our microservice.
We are not going to cover SQL server detailed information in the scope of this article. I hope that you are already aware of Databases.


-
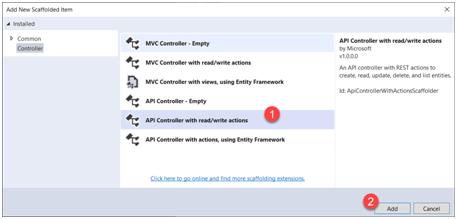
Step 11 Now add a new controller in the controller folder with read/write option.


-
Step 12 Add the code below in the controller.
publicCustomerContextCustomerContext; publicCustomerController() { CustomerContext = newCustomerContext(); } [HttpGet] publicIEnumerable < Customer > Get() { var customers = CustomerContext.Customers.ToList(); return customers; } [HttpGet("{id}", Name = "Get")] public Customer Get(int id) { var customer = CustomerContext.Customers .Where(c => c.Id == id) .FirstOrDefault(); return customer; } 
-
Step 13 We are done with the GET implementation of the microservice. Let’s test this.
Press F5 and hit the following URL’s mentioned in the screenshot.
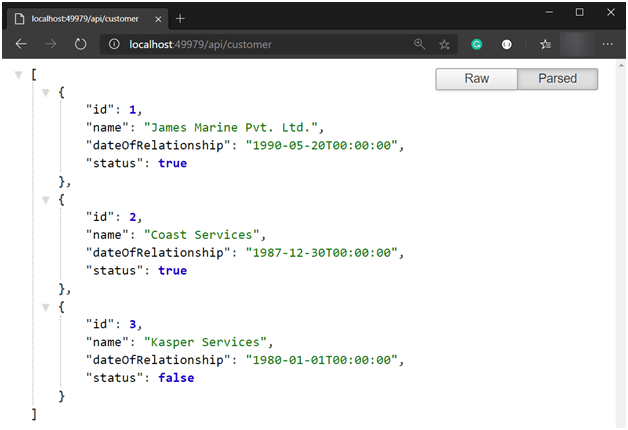

As you can see, in the first screenshot, we hit the Get API which returns the list of all the customers which we created in database manually.
It will make business sense when the right developers are deployed. To understand how we work do consult our team.
In the second screenshot, we again hit the get api endpoint along with an Id. We passed Id as 2, and we got the information of that customer whose ID was 2.
Similarly, you can write code to add Customers, Update Customers and Delete customers. That’s your homework.
Thank you.


