Introduction to Cloud Native Microservices
Cloud native microservices can be defined as the design and deployment of microservices that are fully cloud enabled and make the most of the cloud characteristics like elasticity, distributed infrastructure, and managed services. Cloud native architectures which are built using cloud native technologies such as Kubernetes, Docker, serverless functions, and managed databases provide a scalable and resilient environment which make them ideal for volatile applications. Java development services can further enhance the development and optimization of cloud-native microservices, ensuring robust and efficient solutions.
1. OnPrem Limitations vs Cloud Advantage
- OnPrem Limitations: Scaling onprem microservices usually involves buying extra hardware, networking equipment, and data center resources. As the load increases, the ability to scale becomes expensive and slow, leading to an overallocation or underutilization of resources.
- Cloud Advantage: Cloud providers like AWS, Azure or Google Cloud easily scale consumption resources as needed. Automatic services bring autoscaling, georedundancy and load balancing into the mix so microservices can take over changing loads without a hitch.
- OnPrem Limitations: An on prem server means more servers each service gets its resources which will most likely lead to some resources being wasted. In the same vein upgrading, or decommissioning hardware can take time and cost a whole lot.
- Cloud Advantage: Cloud based on multitenant architectures do not waste resources but rather utilize shared resources in a more efficient manner especially when it comes to containerization.
2. Improved Resource Efficiency
- On Prem Limitations: Maintaining on prem hardware means dedicated resources for each service, leading to idle or underutilized resources. Additionally, upgrading or decommissioning hardware can be time consuming and costly.
- Cloud Advantage: Cloud native architectures use multitenancy and shared resources more effectively, especially with containerization technologies like Kubernetes. Containers isolate workloads on shared infrastructure, allowing efficient resource allocation, minimized waste, and reduced operational overhead.
3. Accelerated Development and Deployment with DevOps and CI/CD
- On Prem Limitations: On premises environments mostly have longer provisioning and deployment times so because of this it can limit the speed of the software development lifecycle.
- Cloud Advantage: Cloud native platforms actually enable Continuous Integration and Continuous Deployment (CI/CD) that allows dev teams to rapidly test n build and deploy their microservices. With DevOps tools and cloud services company can automate testing and deployment workflows their by they can achieve really faster release cycles and it will reduce deployment risks.
4. Operational Resilience and High Availability
- On Prem Limitations: Ensuring high availability on prem involves setting up redundancy, disaster recovery, and failover mechanisms, often leading to complex configurations and high costs.
- Cloud Advantage: Cloud native applications can be deployed across multiple availability zones or regions, automatically distributing workloads for resilience and minimal downtime. Built in failover capabilities ensure that applications remain operational in case of hardware or network failures, delivering higher reliability.
5. Cost Effectiveness and Financial Efficiency
- On Prem Limitations: Running and maintaining physical infrastructure for microservices can result in high fixed costs, especially when usage fluctuates.
- Cloud Advantage: Cloud native environments operate on a payasyougo model, allowing organizations to pay only for resources consumed. Cloud providers also offer pricing models for long term savings, such as reserved instances, spot pricing, and savings plans.
6. Global Reach and Edge Capabilities
- On Prem Limitations: Deploying onprem resources in different geographic regions can be expensive and time consuming. Applications with a global user base may experience latency issues due to centralized data centers.
- Cloud Advantage: Cloud native platforms offer global infrastructure, enabling microservices to be deployed in multiple geographic regions. This enhances latency and user experience by placing services closer to users. Moreover, cloud providers offer edge computing software development solutions that allow processing at the network’s edge, reducing latency further for IoT and real time applications.
7. Security and Compliance Improvements
- On Prem Limitations: Security in on prem data centers requires significant investment in personnel as well as monitoring tools and also threat detection systems. Compliance also requires complex configurations and auditing efforts.
- Cloud Advantage: Cloud providers offer various advanced security features such as identity management, encryption and network firewalls and also predominantly compliance certifications. Cloud native architectures also support automated security testing within CI/CD pipelines and it really helps to detect vulnerabilities in early stage and maintain compliance with industry standards.
Key Cloud Native Technologies and Patterns
- Containerization and Orchestration: Containers provide lightweight and consistent environments for microservices and it will make it highly portable. Kubernetes as you will be knowing a popular orchestration tool and it automates container management scaling and deployment across cloud environments.
- Serverless Architectures: Serverless functions allow us to run code without provisioning or we can say without managing servers. It is ideal for event-driven applications and microservices that need to scaled based on needs or demand and reduces operational complexity.
- API Gateways: API Gateways act as entry points for microservices, handling tasks like load balancing, request routing, and security. They improve communication between services and help expose microservices to external clients in a secure manner.
- Service Meshes: Tools like Istio and Linkerd provide features for managing interservice communication. They improve observability, security, and reliability of microservices communications, offering better insights into traffic flows.
What are Migration Challenges and how can we solve?
- Data Migration and Integration: if we have to move data to the cloud then it can be challenging because of data volume, security and moreover latency concerns. So to solve this , we can use phased data migration or hybrid strategies. Also we can go with cloud native databases that support replication.
- Rearchitecting for Cloud Native: Traditional applications may not be designed for cloud native architectures. A gradual refactoring approach can be used, focusing on decomposing monolithic services into microservices incrementally and introducing cloud native elements step by step.
- Security and Compliance Adjustments: Migrating to the cloud requires rethinking security practices, such as adapting identity and access management for cloud environments and configuring cloud native monitoring tools to maintain compliance.
How to migrate a Spring Boot based ecommerce microservices application from an on premises environment to a cloud native?
Migrating a Spring Boot based ecommerce microservices application from an on premises environment to a cloud native setup on AWS requires a detailed plan, as it involves multiple services, databases, and real time user interactions. Here’s a structured approach with a real time example, focusing on common AWS services, cloud native patterns, and best practices.
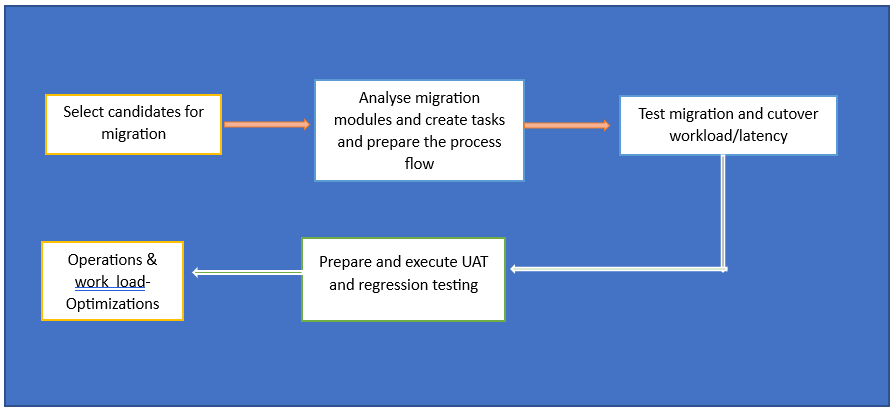
1. Evaluate and Plan the Migration
Steps: Inventory Services: Identify all microservices in your ecommerce application. Typical services could include:
- Product Service: Manages product catalog data.
- Order Service: Handles customer orders.
- Inventory Service: Manages stock levels.
- User Service: Manages customer data and authentication.
- Payment Service: Processes payments.
- Dependencies: verify and list the dependencies for each individual micro service such as databases, third party integrations n message brokers etc.
- Define Success Metrics: Define the metrics that will determine a successful migration such as latency n downtime tolerance and performance as well as cost efficiency.
2. Choose the AWS Services and Architecture
For an ecommerce application, an AWS cloud native setup might include:
- Amazon EKS (Elastic Kubernetes Service) or Amazon ECS (Elastic Container Service): To orchestrate containers that runs for each microservice.
- Amazon RDS (Relational Database Service): TO manage relational databases such as MySQL, PostgreSQL etc
- Amazon DynamoDB: To handle catalog or cart data if you need a NoSQL database.
- Amazon S3: For storing static assets like product images.
- Amazon API Gateway: For routing requests to microservices and handling authentication and throttling.
- AWS Lambda: For serverless functions that can process image resizing or also notifications or analytics asynchronously.
- Amazon SQS (Simple Queue Service) or Amazon SNS (Simple Notification Service): To manage order processing for message queues and asynchronous tasks.
- Amazon CloudWatch: For monitoring and logging application health.
3. ReArchitect for Cloud Native
Refactoring the application for a cloud native setup helps in leveraging the cloud benefits fully.
- Containerize Services: We have to use Docker to containerize each Spring Boot microservice if it’s not already done. Each container should include only the code and dependencies for one microservice.
- Decouple Components: We have to use cloud based queues (for ex: Amazon SQS) for asynchronous operations for example that includes processing orders or updating inventory and also to avoid tight coupling between services.
- Use API Gateway for Access Management: Amazon API Gateway can help manage, secure n throttle requests to your services.
4. Set Up the Cloud Environment
Step-by-Step Setup:
1. Provision Amazon EKS (or ECS) Cluster:
- Create an EKS cluster to orchestrate containers running the Spring Boot development services. Kubernetes will manage deployment, scaling, and interservice communication.
- Use kubectl and Helm charts to manage and deploy services on EKS.
2. Set Up Database Migration:
- Migrate your on prem database to Amazon RDS. If using MySQL or PostgreSQL, AWS Database Migration Service (DMS) can help with live data migration.
- Use RDS MultiAZ for high availability, especially for critical data like customer details, orders, and payment history.
3. Set Up File Storage with Amazon S3:
- Migrate product images and other assets to Amazon S3. Use S3 versioning and lifecycle policies to optimize storage costs and retrieval times.
- Integrate the services to access S3 files securely by using presigned URLs or setting appropriate IAM policies.
4. Deploy API Gateway and Lambda:
- Set up Amazon API Gateway as the front door for API requests. Route requests to the appropriate microservices and handle security with AWS IAM or Amazon Cognito for user authentication.
- Implement AWS Lambda for noncritical, event driven tasks, such as sending email confirmations, notifications, or resizing product images.
5. Implement Caching and CDN:
- Use Amazon Elasti Cache (Redis or Memcached) for caching frequently accessed data, like popular products or categories.
- Use Amazon CloudFront as a CDN for faster content delivery, especially for S3hosted product images.
5. Testing and Validation
Before fully switching over, conduct rigorous testing:
- Functional Testing: Ensure each service functions as expected in the cloud.
- Load Testing: Test the application under realistic traffic to ensure the cloud environment can handle peak loads.
- Resilience Testing: Simulate failures (e.g., database down, high load on API) to see how the services behave and recover.
6. Deploy and Cutover Strategy
When the cloud setup is ready, you can plan a phased cutover:
- Data Sync and Delta Migration:
Run a final data sync using DMS for the database, making sure all customer, order, and product data is up to date.
For real time updates, consider running both on prem and cloud setups in parallel and gradually direct traffic to the cloud environment.
- DNS Cutover:
Switch DNS to route traffic to the new cloud native environment. Use Amazon Route 53 for DNS management to direct traffic to the API Gateway.
Monitor traffic flow closely after the switch to detect and address any unexpected issues.
- Rollback Plan:
Set up a rollback strategy that allows you to revert to the on prem system if critical issues arise during cutover.
7. Monitoring and Optimization
After migration, ongoing optimization and monitoring are crucial.
- CloudWatch Metrics: Use Amazon CloudWatch to monitor service health, request metrics, and error rates.
- Logging with CloudWatch Logs or ELK Stack: Set up detailed logging for troubleshooting. Consider aggregating logs with ELK or Amazon OpenSearch for real time insights.
- Auto Scaling Adjustments: Adjust autoscaling policies based on the observed traffic patterns to optimize costs.
Security Monitoring: Use AWS Guard Duty to detect malicious activity and monitor IAM roles and permissions for secure access management.
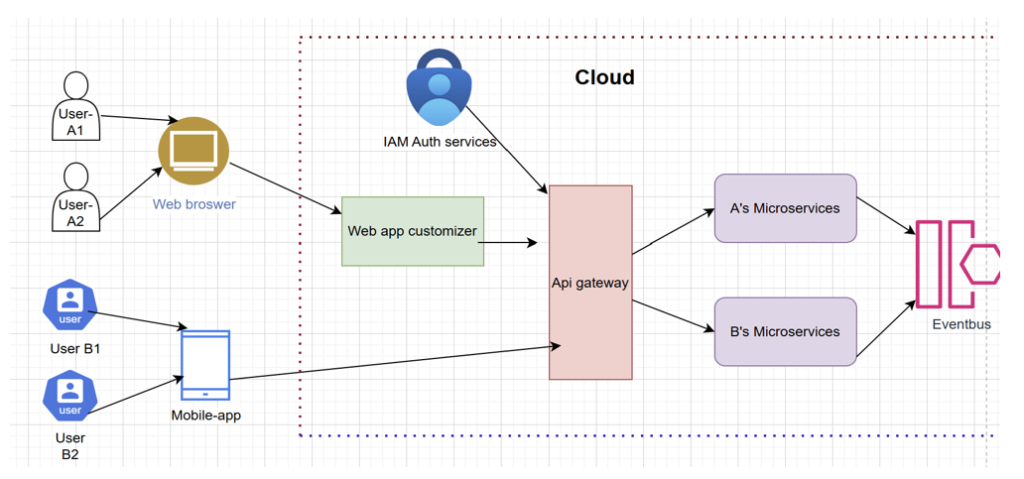
Real Time Example: Ecommerce Checkout Process
Let’s break down how the ecommerce application might handle an order checkout in the AWS cloudnative setup:
- User Browses Products:
- The user service is triggered to fetch product details from Amazon RDS (if relational data) or DynamoDB (if NoSQL).
- Amazon CloudFront caches product images stored in S3 for faster loading.
- Order Placement:
- The customer places an order, which triggers the Order Service running in EKS.
- The Order Service uses API Gateway and a Lambda function to validate user credentials and access permissions.
- Once validated, it enqueues the order in Amazon SQS for asynchronous processing.
- Payment Processing:
- A Lambda function reads the SQS queue and triggers the Payment Service.
- The Payment Service interacts with a third party payment gateway or an AWS Partner network, using VPC endpoints to secure communications.
- Inventory Update:
- Upon successful payment, the Inventory Service is notified (either via direct call or SNS message) and updates the product stock in DynamoDB.
- The user receives a confirmation email sent by a Lambda function triggered by SNS, while the transaction details are logged to CloudWatch.
Detailed Implementations:
- Creating a complete, end-to-end ecommerce application using Spring Boot and AWS cloud native services is a significant project, so I’ll explain an example implementation for the core services—Product, Order, Inventory, Payment and demonstrate how to integrate these services using AWS components, code, and configurations.
- This implementation will include examples for containerized microservices running on Amazon EKS, using Amazon RDS for the database, Amazon S3 for asset storage, and Amazon SQS for order processing.
Architecture Overview
1. Product Service: Manages the product catalog, retrieves data from Amazon RDS, and stores product images in Amazon S3.
2. Order Service: Manages customer orders and communicates with the Inventory and Payment services.
3. Inventory Service: Updates product stock levels based on customer purchases.
4. Payment Service: Processes payments (simulated for this example) and confirms transactions.
Key AWS Services Used
- Amazon EKS for container orchestration.
- Amazon RDS (MySQL) for relational database management.
- Amazon S3 for static assets.
- Amazon API Gateway for managing API requests.
- AWS Lambda for handling asynchronous tasks.
- Amazon SQS for order processing.
Step 1: Containerize Services
- Each microservice should be containerized using Docker. Below is a Docker file for a simple Spring Boot microservice.
Dockerfile (for each service)
FROM openjdk:17jdkslim
COPY target/aegismicroservice.jar app.jar
ENTRYPOINT [“”, “jar”, “/app.jar”]
1. Build the Docker image for each service:
- docker build t aegismicroservice.
2. Push each image to Amazon Elastic Container Registry (ECR) to make them accessible to EKS.
Step 2: Product Service (Spring Boot)
The Product Service retrieves data from Amazon RDS (MySQL) and stores images in S3.
AegisProductService.
@RestController
@RequestMapping("/aegis/products")
public class AegisProductService {
    @Autowired
    private ProductRepository productRepository;

    @Autowired
    private AmazonS3 amazonS3;

    private final String bucketName = "aegisecommerceproductimages";

    @GetMapping("/aegis/{id}")
    public Product getAegisProductById(@PathVariable Long id) {
        return productRepository.findById(id)
                .orElseThrow(() > new ProductNotFoundException("Demo aegis Product not found"));
    }
Database Configuration (RDS)
- Add RDS MySQL configuration to application.yml.
  datasource:
    url: jdbc:mysql://myrdsinstance.cmn4gjxkpikb.useast1.rds.amazonaws.com:3306/ecommerce
    username: admin
    password: mypassword
  jpa:
    hibernate:
      ddlauto: update
    showsql: true
S3 ConfigurationL
We have to use AWS credentials and then we can add AWS_ACCESS_KEY_ID, AWS_SECRET_ACCESS_KEY and AWS_REGION to your environment or use IAM roles if it is running on EKS.

Step 3: Order Service with Amazon SQS
The Order Service sends order requests to an SQS queue for asynchronous processing.
AegisOrderService.

SQS Configuration

Step 4: Inventory Service with Database Update
The Inventory Service listens to the SQS queue and updates product stock levels in Amazon RDS.
AegisInventoryService.

Step 5: Payment Service Simulation
The Payment Service confirms transactions (this example simulates payment processing).
PaymentService.

Step 6: Deploy on Amazon EKS
1. Push Images to ECR
- aws ecr createrepository repositoryname aegismicroservice

2. EKS Cluster Setup:
- Create an EKS cluster using the AWS CLI or the Management Console.
3. Deployments and Services:
- Create Kubernetes manifests for each microservice.
- Use kubectl to deploy services to the EKS cluster.
Step 7: API Gateway for Public Access
Use Amazon API Gateway to expose endpoints for each microservice and handle security.
- Create REST APIs: Set up a REST API and define resources for /products, /orders, /inventory, and /payment.
- Integrate with EKS: Configure API Gateway to route requests to the EKS services by using AWS Load Balancer or VPC link.
Migrating a Spring Boot microservices application to AWS with circuit breaker patterns and JWTbased security can involve setting up essential components like Spring Cloud Circuit Breaker (Resilience4j), JWT authentication, and AWS services. Here’s an example with code snippets, configurations, and an approach that uses AWS services like Amazon EKS, API Gateway, and Amazon RDS.
Architecture Overview
- Product Service: Manages the product catalog and accesses product data stored in Amazon RDS.
- Order Service: Processes orders, integrates with other services, and uses circuit breakers for resilience.
- Auth Service: Provides JWTbased authentication.
- API Gateway: Manages API access and security.
- Resilience4j Circuit Breaker: Handles fallback scenarios for the Order Service when the Product Service is down.
Step 1: Configure JWT Authentication in Auth Service
Create an Auth Service to issue JWT tokens. This service will authenticate users and issue JWTs to access other services.
AuthController.

JwtService.

Security Configuration
Configure Spring Security to secure the API endpoints based on JWT.

Step 2: Implement Circuit Breaker in Order Service with Resilience4j
Add a circuit breaker pattern in the Order Service for calling Product Service.
AegisOrderService.

ProductClient.
Use Spring’s RestTemplate with Resilience4j’s Circuit Breaker to call Product Service.
@FeignClient(name = “aegisproductservice”, url = “${product.service.url}”)
public interface AegisProductClient {
@GetMapping(“/aegis/products/{id}”)
Product getAegisProductById(@PathVariable(“id”) Long id);
}
application.yml
Add Resilience4j configuration for the circuit breaker.

Step 3: Deploy on Amazon EKS and Use AWS RDS for Databases
1. Containerize Services
Each service should have its Dockerfile:
Dockerfile for Spring Boot Microservice
FROM openjdk:17jdkslim
COPY target/.jar app.jar
ENTRYPOINT [“”, “jar”, “/app.jar”]
Build and push each container image to Amazon ECR:
- aws ecr createrepository repositoryname myservice
- docker tag myservice:latest 13579135.dkr.ecr.useast1.amazonaws.com/myservice
- docker push 13579135.dkr.ecr.useast1.amazonaws.com/myservice
2. Deploy on EKS
- Set up an Amazon EKS cluster using the AWS Console or CLI.
- Deploy Kubernetes manifests for each service:
apiVersion: apps/v1
kind: Deployment
metadata:
  name: aegisorderservice
spec:
  replicas: 2
  selector:
    matchLabels:
      app: aegisorderservice
  template:
    metadata:
      labels:
        app: aegisorderservice
    spec:
      containers:
       name: aegisorderservice
        image: 13579135.dkr.ecr.useast1.amazonaws.com/ aegisorderservice:latest
        ports:
         containerPort: 8080
3. Database Setup on Amazon RDS:
- Migrate your existing database to Amazon RDS for MySQL or PostgreSQL.
- Update the application.yml to use RDS:
spring:
  datasource:
    url: jdbc:mysql://myrdsinstance.cmn4gjxkpikb.useast1.rds.amazonaws.com:3306/ecommerce
    username: admin
    password: password
  jpa:
    hibernate:
      ddlauto: update
    showsql: true
Step 4: Expose Services through API Gateway
- Set up Amazon API Gateway to handle routing and security for publicfacing APIs.
- Define REST API endpoints for /auth, /order, /product, and apply JWT authorization through custom authorizers if needed.
- Configure throttling, rate limits, and API keys.
Step 5: Testing and Validation
- Deploy services and test JWT authentication by logging in to generate a token, then use it to access secured endpoints.
- Simulate Failures in Product Service to verify circuit breaker behavior in the Order Service.
Sample API Testing with Postman
- Login to generate JWT token:
POST /auth/login
Body: { “username”: “user”, “password”: “password” }
- Place an Order with JWT token:
POST /orders
Headers: Authorization: Bearer
Body: { “productId”: 1, “quantity”: 2 }
If the Product Service is down, the Order Service should use the fallback method due to the circuit breaker.
When we plan to migrating systems to AWS, then there’s the challenge of making sure critical data including passwords for databases and API keys are protected. AWS has assembled quite a combination of tools as well as good security practices that enable the safe selection, control, and access of secrets within any of your applications.
This paper emphasizes a few of these strategies:
1. AWS Secrets Manager
A login service fully controlled by AWS that allows the storage of sensitive information such as database passwords, API tokens and other’s through the use of a login page linked to a management console. AWS accounts like Amazon RDS can also be used with it, which also offers automated secret rotation functionalities as an additional layer of security.
Steps to use Secrets Manager:
- Create a Secret:
Go to the Secrets Manager console, create a new secret, and select the type of secret (e.g., RDS credentials).
Store sensitive information (like database username and password).
- Access Secret from Application:
Add the AWS SDK to your Spring Boot application’s dependencies.
Use AWS Secrets Manager to retrieve the secret programmatically in the application.
Example code to fetch secrets:

Spring Boot Configuration Example:
After retrieving secrets, set up the configuration:
spring:
datasource:
url: jdbc:mysql://myrdsinstance.cmn4gjxkpikb.useast1.rds.amazonaws.com:3306/mydb
username: myuser
password: ${DB_PASSWORD} Load dynamically from Secrets Manager
This way, you access your database password and other secrets securely without hardcoding them in your source code.
2. AWS Systems Manager (SSM) Parameter Store
AWS Systems Manager Parameter Store is a service and it allows to store data such as configuration variables and secrets. It also offers free tier usage and is suitable for configurations that do not require automatic rotation.
Steps to use SSM Parameter Store:
- Store Parameters:
- Go to the Systems Manager console, navigate to Parameter Store, and add a new secure parameter (e.g., /prod/dbpassword).
- Retrieve Parameters in Application:
- You can use the AWS SDK to retrieve parameters directly in your application.
- Example code to fetch parameters:

4. Use IAM Roles for Service Authentication
When our springboot app runs on AWS (for example: on EC2 or ECS) then we can assign IAM Role to the instance or container that provides permissions to access AWS services securely.
- We have to create IAM Role with permissions so that we can access Secrets Manager or Parameter Store.
- Then next is to attach the Role to your EKS pod, ECS task, or EC2 instance.
- AWS SDKs will automatically retrieve credentials from the instance metadata, allowing your application to access secrets without embedding credentials in code.
- Environment Variables with Lambda Functions
If using AWS Lambda, store secrets as environment variables in encrypted form, or access them directly from Secrets Manager or Parameter Store at runtime. Lambda environment variables can be configured to automatically decrypt using KMS keys.
Example of using Secrets Manager in Lambda:

Use db_password in your database connection logic
5. Automatic Rotation of Secrets
AWS Secrets Manager helps you to set up automatic rotation for database credentials as well as API keys and other secrets. This is especially useful for long-running applications where manual rotation could be tedious.
- Enable automatic rotation in Secrets Manager for your database credentials.
- Secrets Manager will rotate and update credentials automatically, ensuring that your application always has updated access without manual intervention.
Best Practices Summary
- Use AWS Secrets Manager for sensitive secrets and enable automatic rotation.
- Use AWS SSM Parameter Store for configuration data and nonsensitive secrets.
- Use IAM Roles with least privilege to grant applications access to Secrets Manager or Parameter Store.
- Avoid hardcoding secrets directly in application code; instead, fetch them securely at runtime.
- Use encryption where possible, such as encrypted environment variables in Lambda or encrypted parameters in Parameter Store.
These approaches provide secure, scalable, and manageable ways to handle secrets and sensitive data when migrating your Spring Boot microservices to AWS.
FAQs:
How to achieve seamless migration of Springboot Microservices From On-Prem to Cloud-Native with AWS
Subject:
- What are differences between cloud native and on-prem?
- What are advantages of the cloud native applications?
- How to start with migrating large complex microservices applications from on-prem to cloud?
- How to implement an e-commerce application using springboot microservices and migrate this app from on-prem to cloud native with AWS?

