What is REPR (Request Endpoint Response)
REPR (Request-Endpoint-Response) pattern is a commonly used designed pattern in development of web applications, especially when building a web API project. This is a pattern where you organize your APIs around endpoints instead of controllers which is similar to Vertical Slice Architecture. It’s neither a REST pattern nor a resource-based pattern, this is useful for defining the API endpoints.
REPR pattern gives developers the control to use this as RESTful service as well as RPC (Remote Procedure Call) style endpoint. Like any other popular frameworks, Asp.Net Core development company also supports REPR design pattern to build robust & scalable applications.
Major Components of REPR Pattern & How it Works
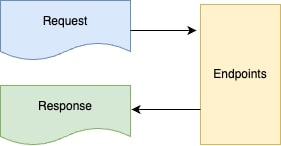
In this pattern, the application’s functionality is divided into three distinct components: the request, the endpoint, and the response.

The request represents an incoming HTTP request made to the server. It supports all widely used HTTP methods such as GET, POST, PUT, DELETE, HEAD, etc., along with request headers, and parameters sent by the client.
The endpoint (the most important part) is responsible for handling the request and performing the necessary operations. It acts as the mediator between the request and the response. Using the parameterized routing system, endpoints are defined. Developers can specify the URL pattern and the associated action, method & parameters to be executed over there.
Finally, the response represents the generated output by the endpoint after processing the request through the service layer. It includes the content of the response, which can be HTML, JSON, or any other type of data with appropriate HTTP status code. Partnering with a Java development company can ensure that these endpoints are efficiently designed and implemented, leveraging Java’s robust capabilities to handle and deliver various types of response data effectively.
Pros & Cons of REPR (Request Endpoint Response)
Like any other design patterns REPR has also various plus & minus points. While developers are choosing REPR as design pattern in their project, the points below should be considered.
Pros:
- Separation of Concern: The REPR pattern is for a clear separation of concerns by dividing the functionality of applications into different separate components. As an advantage code becomes cleaner and more maintainable.
- Code Reusability: The pattern allows for better code reusability by separating the request handling and response generation logic into different reusable components. This brings modular and reusable code, reducing duplication and improving development efficiency.
- Better Performance: The REPR pattern promotes efficient memory utilization through customized request handling and response generation.
- Consistency: By following REPR pattern, developers can ensure higher code consistency than old MVC Controller approach.
- Better Error Handling: The pattern allows better error handling by defining specific responses (data & HTTP status codes) for exceptions for each endpoint. This can be achieved globally as well as individual API level.
- Testability: REPR pattern ensures unit testing components to be handled in more efficient way by separating request/response handling. It enhances the test coverage and helps to troubleshoot fast.
- Scalability: REPR decouples the request & response processing logic, which helps to make more scalable applications in terms of individual components as needed. This results in better performance & resource management.
- Improve Security: Again, by separating the request & response logic, REPR pattern helps to improve better access & authorization controls.
- Easy Debugging: For a complex application with huge numbers of multiple endpoints & requests, REPR pattern helps to debug through the application easily by identifying which component is causing issues.
Cons:
- More number of files to manage: Every APIs are. Being managed in a separate file unlike a Controller.cs file. This leads to a massive number of files under the Controller folder. Developers must manage with proper folder & indent structure to maintain the APIs.
- Duplicating Attributes: Developers might feel sometimes that they are duplicating some of the attributes on the APIs.
- Separate APIs in Swagger by default: While developers are creating separate files for every API, Swagger reads through all and shows all APIs separately. For e.g. if we have Two APIs like api/product/add and api/product/getall, these two wouldn’t be under Customer module initially. Developers need to tag those together to show them as a single module.
How to Implement
Now let’s see how we can achieve the REPR pattern in a .NET Core Web API project. Here we will discuss the different approaches to convert a traditional MVC Web API project into REPR pattern. To achieve REPR pattern in .NET Core project, developers can go ahead on a custom coding for different APIs however there are various popular NuGet Packages available to create an API through REPR pattern.
Traditional MVC Web API Application
In our typical MVC Web API controller with multiple methods. Each action method decorated with HTTP methods represents an API. Let’s say we have a Product API where users can Create Products through api/product/add and get a list of products through api/product/getAll.
 namespace REPRDemo.Controllers;
 [ApiController]
 [Route("api/[controller]")]
 public class ProductController : ControllerBase
 {
     private readonly IProductService _productService;
     public ProductController(IProductService productService)
     {
         _productService = productService;
     }
     // GET api/Product/GetAll
     [HttpGet]
     public async Task<List<ProductModel>> GetAll()
     {
         return await _productService.GetAll();
     }
     // POST api/Product/Add
     [HttpPost]
     public async Task<ProductModel> Add(int id, [FromBody] ProductModel value)
     {
         return await _productService.Add(id, value);
     }
 }
To back these two APIs, we have a service named IProductService in the service layer of the solution. This service takes care of the connectivity with repository section and data source (can be a database or any external system).
Please note, these two action methods do not have any dependency or common in between apart from the service being used over here and nothing major is happening within those API bodies apart from consuming the IProductService methods. To improve this design, REPR proposes to embrace an API endpoint as the fundamental building block of the APIs instead of having controllers.
Custom Approach
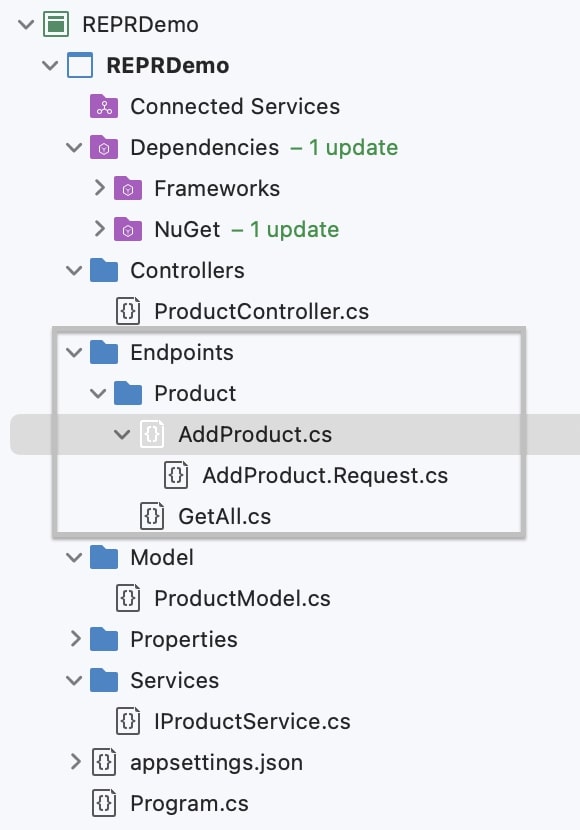
Let’s check how we can improve this pattern using REPR custom code. In REPR, one file represents one endpoint instead of one file having all API endpoints. Here to break the AddProduct & GetAll APIs into two files you have to create two separates .cs files within Controller folder. To make life easier in future you will place these two files in a Product folder within the Controller folder for better maintainability. A better approach to move the Product folder into a separate folder called Endpoint outside of Controller folder to distinguish the endpoints with controllers.
api/product/getall API
 namespace REPRDemo.Controllers;
 [ApiController]
 [Route("api/[controller]")]
 public class ProductController : ControllerBase
 {
   private readonly IProductService _productService;
   public ProductController(IProductService productService)
   {
     _productService = productService;
   }
   // GET api/Product/GetAll
   [HttpGet]
   public async Task<List<ProductModel>> GetAll()
   {
     return await _productService.GetAll();
   }
   // POST api/Product/Add
   [HttpPost]
   public async Task<ProductModel> Add(int id, [FromBody] ProductModel value)
   {
     return await _productService.Add(id, value);
   }
 }
While creating a separate file with class name as API name, we have changed the highlighted parts of in the above code snippet. The GetAllController class is also inherited from ControllerBase class and using a Handle method (decorated with HTTP verb & API route) we are defining the API end point separately.
This small change is fixing the code separation part using REPR pattern, but the downside of this approach is there is no uniformity while defining the API endpoints as the method name (Handle) can vary from developer to developer. Also, we are not documenting the request & response objects.
To mitigate these issues, we usually use different libraries to make this more reusable and full proof. We are going to discuss on the two mostly used libraries, one is API Endpoints and second is Fast Endpoints
Using NuGet Package Ardalis API Endpoints
API Endpoints is an open-source library which has over 2.1 million downloads from GitHub. This helps to achieve REPR pattern in .NET Core API application. To start with API EndPoints, first you need to install the NuGet package using the NuGet command below.
PM> NuGet\Install-Package Ardalis.ApiEndpoints
Once you install the packages, the first thing you have to change is the ControllerBase class, from where your controller is inherited. There are various EndpointBase methods, synchronous or asynchronous ones. Choose one based on your requirements. Things to note, this EndpointBase or EndpointBaseAsync class, both are inherited from ControllerBase class.
Next you have to set the Request & Response of the API and to set the same first check whether your API is expecting any request or not. If your API is expecting any request, then use WithRequest after EndpointBase class. If not, then simply put WithoutRequest. Post that place WithActionResult to define the output of the API. Both WithRequest & WithActionResult are generic methods, so place the output type within angular bracket to make your API more defined.
Post setting the request & response, it’s time for the body of the API. Add the overridden method Handle or HandleAsync in your controller class. Copy your service code and place the same within Handle or HandleAsync method and you are done with your API endpoint.
 using Ardalis.ApiEndpoints;
 namespace REPRDemo.Controllers;
 public class GetAllController : EndpointBaseAsync
 .WithoutRequest
 .WithActionResult
 {
   private readonly IProductService _productService;
   public GetAllController(IProductService productService)
   {
     _productService = productService;
   }
   public override async Task<ActionResult> HandleAsync(CancellationToken cancellationToken = default)
   {
     var products = await _productService.GetAll();
     return Ok();
   }
 }
Let’s check the AddProduct API where the API is expecting a complex input (and id and product data) request. And if the request is blank application will send back BadRequest (400) instead of Ok (200).
As in the AddProduct API, we have two input parameters, one is the Id (integer) and another is product itself of type ProductModel. While Id is passing through query parameter, product details are passing through request body. To accommodate both in the API, we are going to create a separate request file named AddProduct.Request.cs. File name of the endpoint is AddProduct.cs and both the files are stored in Product folder under Endpoint folder.

In the AddProductRequest class, we are adding both the Id and Product properties which will be used in WithRequest class of our endpoint. As Id is passing through query parameter, FormRoute with parameter name has been set. FormBody has been decorated on Product where the details of the product application are going to consume from request body.
 public class AddProductRequest
 {
 [FromRoute(Name ="id")]
 public int Id { get; set; }
 [FromBody]
 public ProductModel Product { get; set; }
 }
Once you are done with the Request model, pass the class AddProductRequest in the generic method WithRequest and set the route path with HTTP verb. Please make sure the name provided in the route path is same as the name defined in the FormRoute attribute.
 public class AddProduct : EndpointBaseAsync
   .WithRequest<AddProductRequest>
   .WithActionResult
 {
   private readonly IProductService _productService;
   public AddProduct(IProductService productService)
   {
     _productService = productService;
   }
   [HttpPost("api/product/add/{id}")]
   public override async Task<ActionResult> HandleAsync(
     AddProductRequest request
     , CancellationToken cancellationToken = default)
   {
     if (request.Product == null)
     {
       return BadRequest();
     }
     await _productService.Add(request.Id, request.Product);
     return Ok();
   }
 }
Using Fast Endpoints
Another popular open-source NuGet package is Fast Endpoint. It is a fast developer friendly alternative to Minimal APIs & MVC Web API. Performance-wise it is faster than Minimal API and uses less memory.
As per the Bombardier Load Test reports, Fast Endpoints, we can execute 35k more requests per second than MVC Web API and 1k requests per second than minimal APIs.
| Method | Mean Execution Time | Ratio | Memory Allocated | Allocated Ratio |
| FastEndpoints | 40.32 μs | 1.00 | 16.71 KB | 1.00 |
| ASP NET 7 Minimal APIs | 44.07 μs | 1.09 | 17.07 KB | 1.02 |
| FastEndpoints (CodeGen) | 44.67 μs | 1.11 | 16.75 KB | 1.00 |
| ASP NET 7 MVC Controller | 63.97 μs | 1.59 | 23.58 KB | 1.41 |
To start with FastEndpoints, you need to install the NuGet package.
PM> NuGet\Install-Package FastEndpoints
Once the NuGet package is installed, you need to create two different classes for Request & Response for each API. These classes are going to be used in Endpoint<TRequest, TResponse> class which you have to inherit from your endpoint class.
Request/Response Model
 public class RequestModel
 {
    [BindFrom (p1)]
 public string Property1 { get; set; }
    [FromBody]
 public MyClass Property2 { get; set; }
 }
 public class ResponseModel
 {
 public string Message { get; set; }
 }
Use BindFrom or FromBody attributes to define the parameter name if it is different from the property defining in your class.
Endpoint class
 public class CustomEndpoint : Endpoint<RequestModel, ResponseModel>
 {
 public override void Configure()
 {
 Post("/hello/world"); // API path
 AllowAnonymous();
 }
 public override async Task HandleAsync(RequestModel r, CancellationToken c)
 {
 await SendAsync(new() ResponseModel
 {
 Message = $"Your input - {r.Property1} & {r.Property2}";
 });
 }
 }
Create a separate endpoint class within Endpoint folder and inherit from Endpoint class. As soon as you inherit your end point class from Endpoint, Visual Studio will prompt you to extend the overridden method HandleAsync.
NET 6 and Beyond: Building High-Performance Web Apps with the Next Generation of ASP.NET
In this article, we will learn about the key highlights of ASP.NET MVC a favored choice for building high-performance web apps with next generation of Asp.net.
Your API body will be described within HandleAsync method and notice the return type of HandleAsync is void. Which means you don’t need to take care of returning the result. SendAsync method will take care of it and as this is a generic method, will take the class as input defined in Endpoint class at the top.
Other than SendAsync there are some other methods also you can use like
- SendNotFoundAsync – Returns 404 Not Found HTTP status code
- SendOKAsync – Returns 200 Ok HTTP status code
Both these methods take request class object as input to send back to the client.
Few major features you can get with FastEndpoints
1. Validation: FastEndpoints uses FluentAPI to validate the input data. To achieve that create a FluentAPI Validator class and add the methods for each property of the Request model class.
2. API Versioning: Use Verson method to set the version of the API. Over there you can also set the deprecated version of the API.
 public override void Configure()
 {
     Get("api/product/getall");
     Version(1, deprecateAt: 4);
 }
3. Remote Procedure Call (RPC) support: Using fastEndpoints it’s possible to have command classes live on one server and their respective handler classes located in a completely different remote server. When commands are executed, they go over the wire to the relevant remote server that hosts the handler.
For the same you have to install FastEndpoints.Messaging.Core in core messaging server and FastEndpoints.Messaging.Remote in the remote server.
After setting up, while you are returning the response back, RemoteExecuteAsync method has to be used to send back the result.
 var result = await new ResponseModel
 {
   Message = $"Your input - {r.Property1} & {r.Property2}";
 }
 .RemoteExecuteAsync();
4. Rate Limit: Setting up the rate limit in FastEndpoints is very easy. In the Configure method, you have to put the Throttle method and pass the hitlimit and durationSeconds.
 public override void Configure()
 {
   Get("api/product/getall");
   Throttle(
     hitLimit: 120,
     durationSeconds: 60,
   );
 }
5. Response Cache: To cache the response of the API, add ResponseCache method with duration in second in the Configure method.
 public override void Configure()
 {
     Get(“api/product/getall”);
     ResponseCache(60); //cache for 60 seconds
 }
6. Swagger Support: Swagger is also supported in FastEndpoints. For the same you have to install FastEndpoints.Swagger NuGet package and enable Swagger in Program.cs file.
Apart from these there are many other topics which FastEnpoints supports. To check those, go through FastEndpoints documentations for more detailed methods. Also go through GitHub page of FastEndpoints to check the source.
Conclusion
The REPR (Request-Endpoint-Response) pattern offers numerous advantages in developing APIs in .NET Core. By separating concerns, promoting code reusability, enabling testability, ensuring scalability, and adhering to best practices, the REPR pattern provides a structured and efficient approach to building web applications.
Adopting the REPR pattern can lead to clean code architecture, increased development speed, and better-maintained applications. As you embrace the REPR pattern in your .NET Core projects, you’ll experience the benefits of its clear separation of concerns and modularized design.


