What is the .NET 8 Keyed Dependency Injection?
Dependency Injection (DI) serves as a design pattern that enhances code manageability and facilitates application testing by removing dependencies within the programming class or method. It imposes loose coupling in programming code irrespective of language.
In simple words, DI involves a method where an object is provided with the necessary objects or functions it requires, rather than internally created by developers. This approach strives to disentangle the tasks of constructing objects and utilizing them, resulting in programs with loose coupling.
Exploring .NET 8 Keyed Services
Within the .NET Core Developers framework, Dependency Injection is accomplished in two ways:
- Dependency Injection by constructor: This method involves injecting dependencies through the constructor.
- Dependency Injection by setter method: In this alternative approach, dependencies are injected through the setter method.
To define the lifetime of the service that is getting injected we have three methods.
- AddTransient: Services with a transient lifetime have generated a new whenever they are requested. This lifespan is most suitable for lightweight, stateless services. For example, if a service is being used in a Controller and View, that service would be initialized two times.
- AddScoped: Services with a scoped lifetime are instantiated on a per-request basis. For example, if a service is being used in a Controller and View, that service would be initialized a single time.
- AddSingleton: Singleton lifetime services are generated upon the initial request (or during the execution of Program.cs if an instance is specified there). Subsequent requests will consistently utilize the same instance.
What is Keyed Dependency Injection?
Till now, we could define a single Interface with a single concrete class or a generic Interface with multiple classes in Program.cs. But the concept is the same for both cases i.e. a single Interface is tagged with a single class to get initiated or injected at the controller or function level. Before .NET 8, if you are setting up a single interface with multiple classes, the last initialized one would work, and the rest of the items would be skipped.
Though in different 3rd party dependency injectors, this feature is already available in .NET 8, Microsoft introduced dependency injections where by default we can now have a single Interface connected with multiple concrete classes through a key to name the instances.
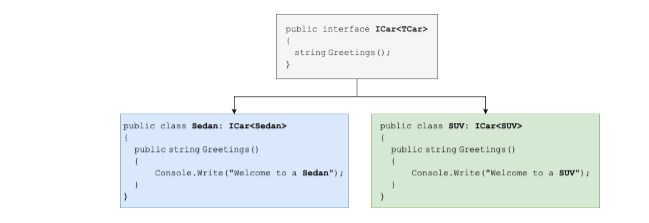
The image below shows how we used to process an interface with a generic model having two concrete classes. In the new process, we haven’t defined the generic class, we have just inherited it from the interface.
Generic DI process with a single constructor passing class name:

DI Process with a single constructor with keyed parameter:

We will know more in the implementation process.
Implementation Process
To implement Keyed Dependency Injection, you must follow the same process as you are doing so far. The only change is to add an extra key parameter to define the service.
To implement the same, you must first define the dependency in the Program.cs file with the help of some extra methods instead of AddSingleton, AddTransient, or AddScoped. In the later part, you must also add the key defined in the Program.cs in your constructor.
Changes in Program.cs
To define the dependency in the program.cs, we usually take the help of AddSingleton, AddTransient & AddScoped based on the lifetime to be defined of the service. Instead of these methods, we must use the ones below.
- AddKeyedSingleton
- AddKeyedScoped
- AddKeyedTransient
var builder = WebApplication.CreateBuilder(args);

builder.Services.AddKeyedSingleton<ICar, Sedan>("SEDAN");

builder.Services.AddKeyedSingleton<ICar, SUV>("SUV");
As you can see, interface ICar is being used for both Sedan & SUV services and a new key has been added as a parameter for use in the Constructor level.
Changes in Controller & Service Level
// Uses the key "SEDAN" to select the SedanService specifically

private readonly ICar _car;

public class SedanService ([FromKeyedServices("SEDAN")] ICar car)

{

_car = car;

}
To define the service in your Controller or Service level constructors you need to define the constructor like below.
// Uses the key “SUV” to select the SUVService specifically
private readonly ICar _car;
public class SUVService ([FromKeyedServices(“SUV”)] ICar car)
{
_car = car;
}
To inject the same in the method level,
public string SUVGreeting([FromKeyedServices("SUV")] ICar car)

{

return _car.Greetings();

}
Changes in Blazor Razor Pages
If you must inject Keyed dependency services in a Blazor page, you can’t use the same within the .razor pages. You must add a new code behind cs file to add the same. To add a new code behind for your razor page, click (dot) + Ctrl in you @Code section, to get the option to move your code to code behind. This way a new file will be created name <your-page>.razor.cs. You can inject the new keyed dependency services into the .cs file.
To inject the keyed service, follow the below code snippet.
namespace ProjectName.Components.Pages

{

public partial class Sedan

{

[Inject Key= "SEDAN"]

public ICar car { get; set; }

// your methods

}

}
Limitation with Minimal APIs
Unfortunately, keyed dependency injection does not work with minimal APIs. So, continue with normal dependency injection instead of keyed services in your minimal APIs.
var app = builder.Build();

// does not work, will throw exceptions

app.MapGet("/sedan", ([FromKeyedServices("SEDAN")] ICar service)

=> return service.Greetings());

app.Run();
Read More:


