What is Identity Management?
Identity Management (IDM) is not just a set of processes and technologies used to manage and secure digital identities within a company; it is a crucial component of modern IT infrastructure. IDM plays a pivotal role in ensuring security, compliance, and efficiency across all digital platforms, including Java application development services. By integrating IDM with Java applications, businesses can enhance their security protocols while streamlining user access management and maintaining regulatory compliance.
Key Components of Identity Management
- Identity Governance: This actually involves defining and applying policies and procedures that decides how identities are managed throughout their lifecycle. It includes diff aspects such as role management, access certification, and policy enforcement.
- Authentication and Authorization: Authentication actually verifies the identity of users or parties which are trying to access applications and but authorization determines the level of access they are granted based on their identity and already defined permissions.
- Single Sign-On (SSO): SSO predominantly enables users to authenticate the user and also it gains access to multiple applications without the necessity of re-entering credentials. This actually improves user experience while maintaining security.
- Identity Lifecycle Management: This applies the processes that involves in managing the identities starting from from creation to deletion or provisioning or de-provision. It also includes tasks such as giving provisioning access, updating various user attributes, and managing role changes.
- Identity Federation: Federation actually allows organizations to extend their IDM provisioning capabilities across different domains or we can say organizations and hence it enables seamless and secure access to shared resources without the need of multiple authentications.
- Auditing and Compliance: IDM solutions actually provide auditing capabilities to track and monitor user activities which ensures actually compliance with regulatory requirements and internal policies. Audits also helps in detecting unauthorized access attempts or policy violations.
Benefits of Identity Management
- Enhanced Security: IDM actually ensures that only those who are authorized users can access the critical resources and it reduces the risk of data breaches and insider threats.
- Improved User Experience: SSO and then streamlined access management processes basically simplify the user interactions with software systems which leads to increased productivity.
- Compliance and Risk Management: By applying access policies and maintaining audit record, actually IDM helps organizations meet regulatory requirements and mitigate risks associated with unauthorized access.
- Operational Efficiency: Automated provisioning and de-provisioning of user accounts actually reduces the administrative overhead which ensures timely access management.
Challenges in Identity Management
Despite its benefits, IDM implementation can face challenges such as:
- Integration Complexity: Basically integrating IDM systems with existing IT infrastructure and software applications can be complex and more resource taking.
- User Adoption: This ensures that users understand and then adhere to IDM policies and procedures and this requires effective communication and training.
- Scalability: As organizations grow, scalability issues may com and at this point requiring IDM solutions can adapt to changing needs and volumes of identities.
Future Trends in Identity Management
Identity Management (IDM) is evolving gradually with some advancements in technologies such as artificial intelligence (AI) and IOT n Blockchain which provides enhanced authentication techniques and decentralized identity solutions. These innovations focuses towards strengthening security, privacy, and user control over digital identitie
IDM is most important element of modern cybersecurity techniques that encompass processes n technologies and policies which protects digital identities while enabling efficient and secure access to resources. Companies must prioritize IDM to actually safeguard sensitive information that complies with regulations, and then to maintain operational resilience in an increasingly interconnected digital landscape.
Significance of Identity Management in Microservices Architecture
Microservices architecture devides n breaks down a monolithic application into chunks of smaller independent services and these services communicate with each other. While this provides lot of benefits wrt scalability and flexibility it also introduces challenges in managing identities and access control:
- Decentralized Authentication: Each microservice must authenticate users and validate their permissions independently, increasing complexity.
- Consistent Authorization: Ensuring consistent authorization policies across multiple services can be challenging.
- Secure Communication: Microservices often communicate over networks, requiring secure channels and robust identity verification.
- Scalability: Identity management solutions should scale with the number of microservices services we are using and also we have to consider the num of users
Key Features of Keycloak
- Single Sign-On (SSO): SSO means with this basically it provides a unified authentication mechanism across multiple applications.
- Identity Brokering and Social Login: This Supports integration with third-party identity providers such as ( Google, Facebook etc).
- User Federation: This allows integration with existing LDAP and Active Directory servers.
- Authorization: With fine graned authorization, this provides advanced access control mechanisms based on roles and policies.
- Admin Console: this offers a web-based interface where you can manage users , their roles and configurations.
Implementing Identity Management in Spring Boot Microservices with Keycloak
1. Setting Up Keycloak
Start by downloading and setting up a Keycloak server. You can download the server from the official Keycloak website.
- Unzip the downloaded file and navigate to the bin directory.
- We have to then start the Keycloak server with the command
- bash
- ./standalone.sh
- Browse the url and access the Keycloak admin console at
- http://localhost:8080/auth and create an admin user.
2. Creating a Realm and Clients
1. Browse the url and access through the admin console and after that create a new realm (ex: “myrealm”).
2. Within this realm, create a new client for your Spring Boot application and set the client protocol to openid-connect and configure the client with appropriate redirect URIs.
3. Configuring Spring Boot with Keycloak
Add the necessary dependencies to your Spring Boot project’s pom.xml:
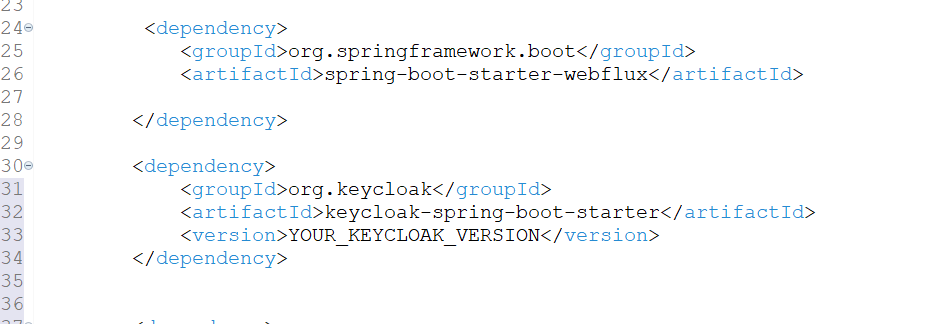
Create a configuration class to integrate Keycloak with Spring Security:
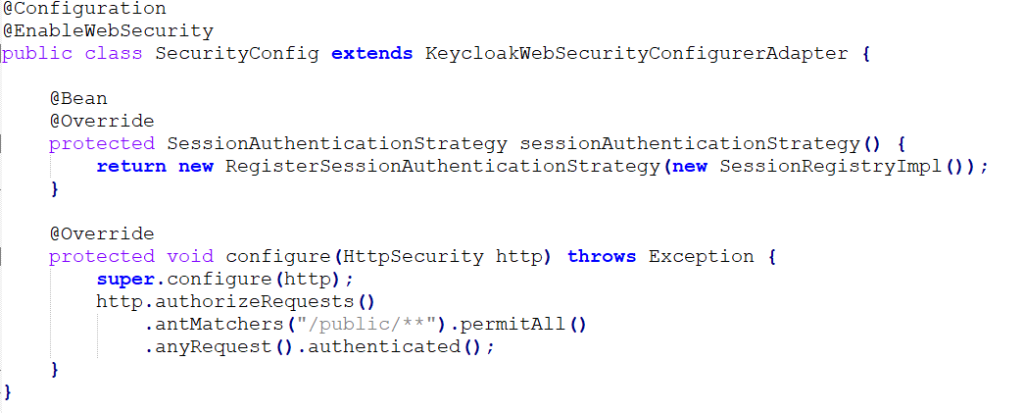
Configure application properties in application.properties or application.yml

4. Securing Endpoints with Keycloak
You can secure specific endpoints by configuring role-based access in your controllers:
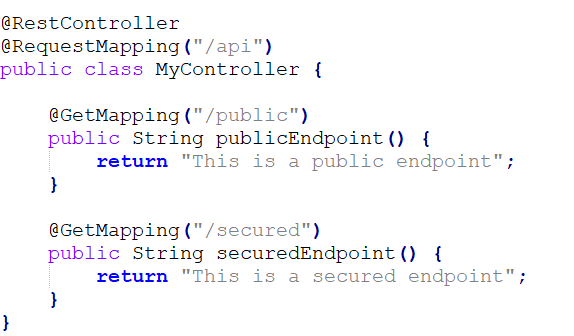
What is Keycloak and Its Architecture?
KeCloak Architecture Diagram:
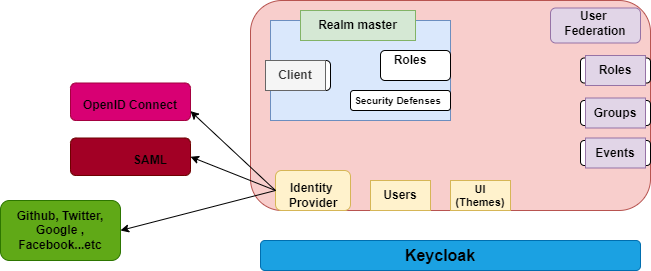
Keycloak is an open-source Identity and Access Management (IAM) solution and it is mainly for modern microservices applications and services. Keycloak offers features such as Single Sign-On (SSO) user federation as well as identity brokering n any social site login and also streamlining authentication and authorization management.
By handling the complex and security-sensitive tasks of user management, Keycloak enables us to focus on application business logic functionality rather than managing identity concerns.
Key Features of Keycloak
- Single Sign-On (SSO): Users can authenticate one time only as I have already explained above and then gain access to multiple applications and services and here user is not required to login again.
- Identity Brokering and Social Login: Keycloak give users the flexibility to log in using external identity providers for ex Google n Facebook.
- User Federation: Integration with existing user databases such as LDAP or Active Directory, allowing seamless user management across systems.
- Centralized Authentication: It manages all user related operations and gives consistent fail safe and secure authentication mechanisms.
- OAuth2 and OpenID Connect: This has support for various protocols those are company standard so that compatibility can be ensured with a wide range of microservices applications and services.
- User Self-service Account Management: Users can manage so many things such as profiles, passwords and their other account details without administrative intervention.
- Role-Based Access Control (RBAC): This basically defines roles and permissions to control user access to different parts of app.
Keycloak Architecture
Keycloak’s architecture gives flexibility and also provides scalability as well as security and also supports a wide range of deployment scenarios from small applications to large enterprise environments. The architecture consists of below several key components:
Keycloak Server
- The core component of Keycloak, responsible for authentication and authorization. It manages user sessions, tokens, and other security-related functions.
- Admin Console: A web-based interface for administrators to manage realms, users, roles, and configurations.
- Account Console: A self-service interface where users can manage their account details, passwords, and sessions.
Realms
- A realm in Keycloak represents a logical group of users, credentials, roles, and groups. Realms are isolated from one another, providing multi-tenancy support.
- Administrators can define multiple realms for different applications or customers, each with its own configuration and user base.
Clients
- Clients are entities that request authentication and authorization from Keycloak. They can be web applications, mobile applications, or other services.
- Each client is configured in a realm and can have different settings for login, token handling, and security constraints.
Identity Providers
- Keycloak mainaly delegate authentication as I already mentioned above to external identity providers such as facebook, linkedin, gmail accounts using protocols like SAML and OpenID Connect as well as OAuth2.
- This feature basically allows users to log in using their credentials from third-party providers without creating new login credentials for the same site
User Federation
- Keycloak supports integration with external user stores, such as LDAP or Active Directory, allowing it to federate users from existing databases.
- This enables seamless user management and authentication across different systems without migrating user data.
Authentication Flows
- Customizable authentication flows enable organizations to define specific steps and conditions for user authentication.
- Keycloak provides a default authentication flow that can be extended or modified to include additional steps like multi-factor authentication (MFA).
Authorization Services
- Provides a set of authorization services based on OAuth2 and UMA (User-Managed Access), enabling fine-grained authorization control for client applications.
- Administrators can define policies and permissions to control access to resources.
Storage
- Keycloak uses rdbms to store user data their credentials and the configuration details.
- It also supports various databases for ex PostgreSQL, MySQL MariaDB, Oracle, and Microsoft SQL Server etc
Extensibility
- Keycloak’s architecture is highly extensible because it allows developers to add custom authentication mechanisms along with user storage providers and event listeners.
- These extensions can be implemented as Keycloak plugins and this will enhance the platform’s capabilities where it can meet company’s requirement.
Deployment and Scalability
Keycloak can be deployed in various dev, stage n prod environments with standalone instances as well as you can deploy as clustered deployments for high availability and scalability. The server can run on-premises or can run in a cloud environment, or in containers using orchestration platforms like Kubernetes.
- Standalone Deployment: Suitable for development, testing, or small-scale production environments. Easy to set up and manage, especially when integrated with software testing services to ensure quality and reliability before moving to larger-scale deployments.
- Clustered Deployment: For larger-scale deployments requiring high availability and load balancing. Keycloak can be configured to run in a cluster, ensuring redundancy and failover capabilities.
- Containerized Deployment: Keycloak provides Docker images for easy containerization. Combined with Kubernetes or OpenShift, it enables scalable and resilient deployments.
How to configure keycloak for sprong boot microservices in Kubernetes?
To Secure microservices, it is really a critical aspect of modern application development and hence Keycloak is very much popular open-source identity and access management solution that provides single sign-on (SSO) as well as authentication and authorization capabilities. By Integrating Keycloak with Spring Boot microservices in a Kubernetes environment provides robust security and streamlined management of authentication and authorization. This article actually gives clear idea about the detailed steps how to configure the Keycloak for Spring Boot microservices and then how to deploy to Kubernetes.
Prerequisites
Please make sure that you must complete the below steps:
- Firstly you need have your Kubernetes cluster set up 5and you have to make it up and running.
- kubectl command-line tool also required to be installed and configure it to interact with your Kubernetes cluster.
- Docker must installed for building container images.
- You should have basic knowledge of Spring Boot, Kubernetes, and OAuth2.
Step 1: Deploy Keycloak on Kubernetes
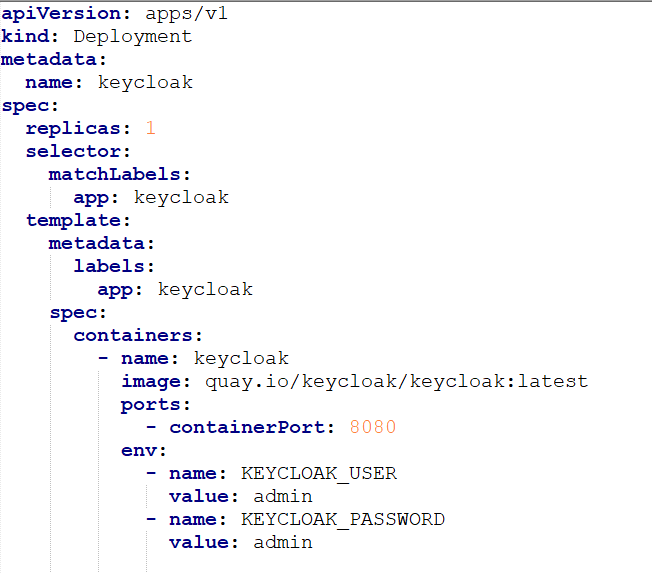
First start with deploying Keycloak in your Kubernetes cluster. We can use the official Keycloak Docker image and a Kubernetes Deployment resource.
Create a Keycloak Deployment YAML file:
Create a Keycloak Service YAML file:
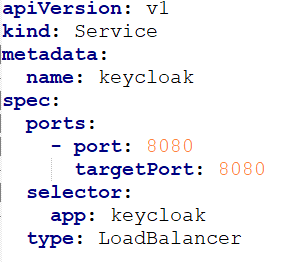
Apply these configurations using kubectl:

Step 2: Configure Keycloak for Your Spring Boot Application
- Access Keycloak: After deploying Keycloak, then try to browse the url and you can access it using the external IP of the LoadBalancer. Then go to http://:8080/auth and log in with the admin credentials you specified.
- Create a Realm:
o In the Keycloak admin console first click the “Add realm” button.
o GIve a name for your realm and click “Create.” - Create a Client:
o Within your realm go to the “Clients” section and then click “Create.”
o Enter your client ID (e.g., spring-boot-client).
o Then set the Client Protocol to openid-connect.
o After that set the Access Type to confidential.
o Save the client and just note the generated Client Secret. - Configure Client Settings:
o Here give the Valid Redirect URIs to http:///*.
o Then set the Base URL and Admin URL to your application’s URL.
o After that save the settings. - Create a User:
o First go to the “Users” section and click “Add user.”
o Then give a username and save.
o After that Set a password for the user in the “Credentials” tab.
Step 3: Configure Spring Boot Microservices
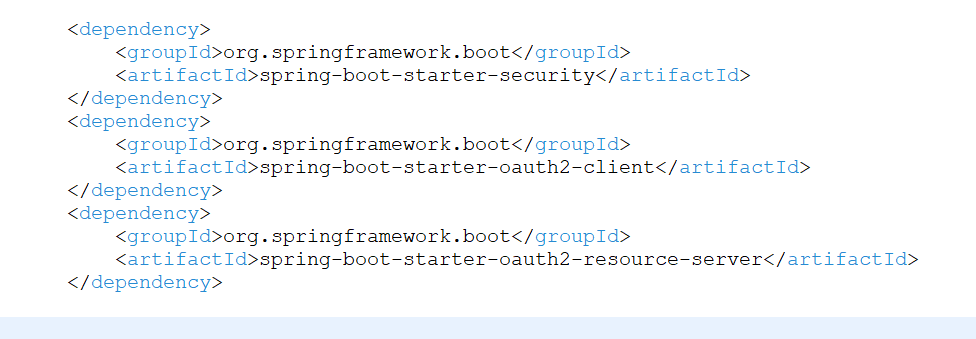
Add Dependencies: Add the following dependencies to your Spring Boot project’s pom.xml:
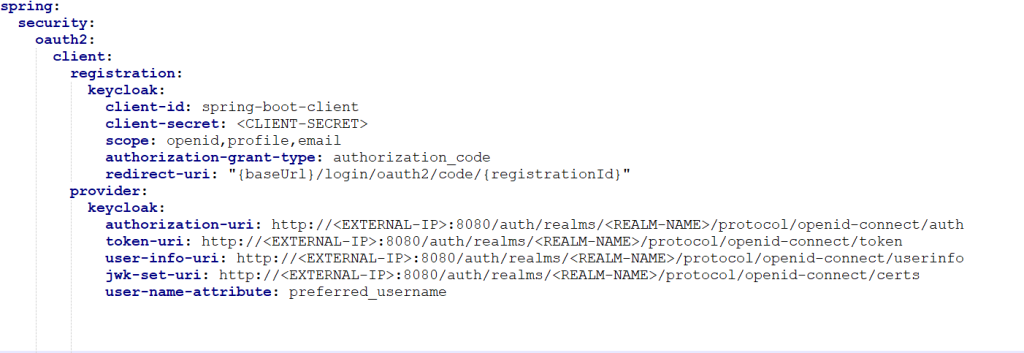
Configure Keycloak in application.yml:
Configure Security: Create a security configuration class to enable OAuth2 login and resource server support.

Step 4: Deploy Spring Boot Microservices on Kubernetes
- Create Docker Image: Create a Dockerfile for your Spring Boot application.
dockerfile

Build and push the Docker image to a container registry.

2. Create Kubernetes Deployment and Service: Create a deployment YAML file for your Spring Boot application.
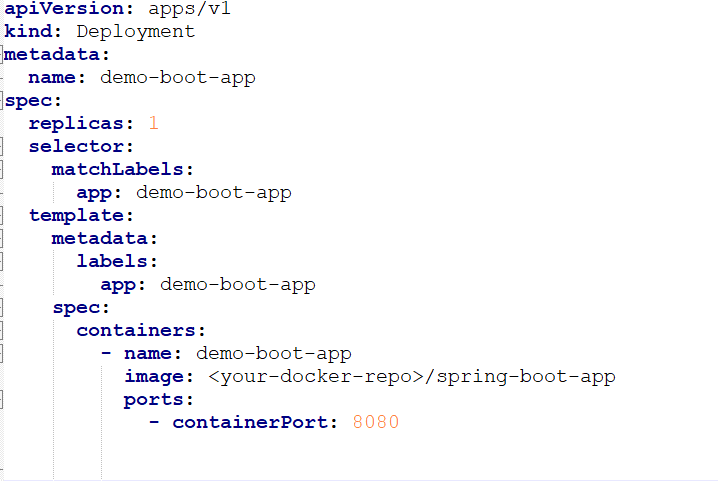
Create a service YAML file for your Spring Boot application.
apiVersion: v1
kind: Service
metadata:
name: demo-boot-app
spec:
type: LoadBalancer
ports:
– port: 80
targetPort: 8080
selector:
app: demo-boot-app
Apply the configurations using kubectl.
kubectl apply -f demo-boot-dep.yaml
kubectl apply -f demo-boot-dvc.yaml
The way to Integrate Keycloak with Spring Boot microservices in a Kubernetes environment provides a scalable and secure way or slution for managing authentication and authorization. By referring the steps above, we can configure Keycloak. Set up your Spring Boot microservices, and deploy them on Kubernetes as I already mentioned it ensures robust security for your applications.
How to integrate Identity Managament in Spring boot micro services using keycloak?
In microservices architecture, managing identity and access control in an effective way is essential for securing services, as it provides seamless user authentication and authorization. Keycloak is an open-source identity and access management solution that offers many features for integrating identity management into any language-agnostic microservices. Additionally, Alternatives to Spring Boot can be used as a powerful security framework to enhance access control and authentication mechanisms. This blog will help you understand the detailed step-by-step process of integrating Keycloak with Spring Boot microservices.
Understanding Keycloak
Keycloak as you know is an open-source IAM tool and it basically supports multiple protocols which includes OAuth 2.0 as well as OpenID Connect and SAML 2.0. It also offers various functianlities such as user authentication, authorization as well as single sign-on (SSO) and user federation and this really makes it a comprehensive solution for identity management.
Setting Up Keycloak
- Download and Install Keycloak:
o You have to download the latest Keycloak distribution from internet from their official website.
o Once downloaded then extract the file and then go to the Keycloak directory.
o Click start to start Keycloak by running the following command:

Then try to open the link in the browser the Keycloak admin console at

and log in using the default admin credentials.
- Create a Realm:
- In the Keycloak admin console, first you have to create create a new realm. A realm in Keycloak is nothing but it represents a security domain.
- Create a Client:
- o Clients are nothing but they are applications in keycloak that interact with the Keycloak server.
- o Here, just create a new client in the realm and then set the client protocol to openid-connect and then specify the client ID and redirect URI (e.g., http://localhost:8080/*).
- Create Users and Roles:
- Next is to create users and assign roles to them within the realm. These roles are created because there are used to manage user permissions within your microservices development services.
Configuring Spring Boot Microservices
Add Dependencies:
Add the required dependencies for Keycloak and Spring Security to your pom.xml:
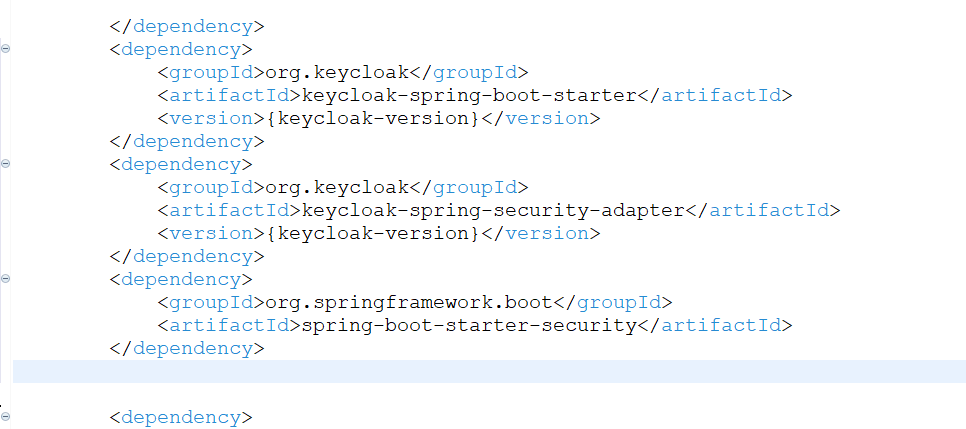
Configure Keycloak in Spring Boot:
Create a keycloak.json configuration file or better use Spring Boot properties to configure Keycloak:

Security Configuration:
Create a security configuration class as below to set up Keycloak security integration:
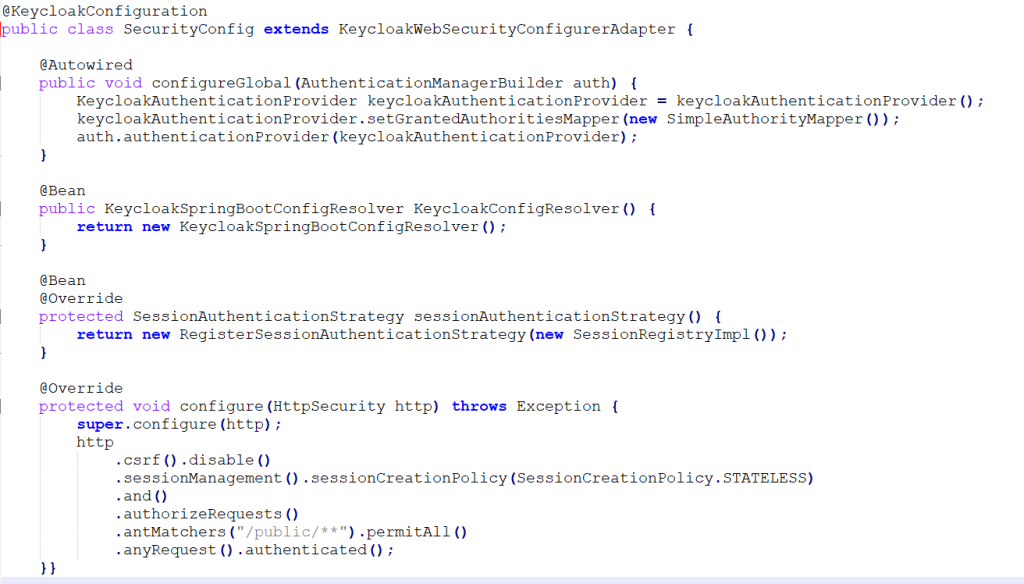
Role-Based Access Control:
Use below required annotations to secure methods and endpoints based on roles:
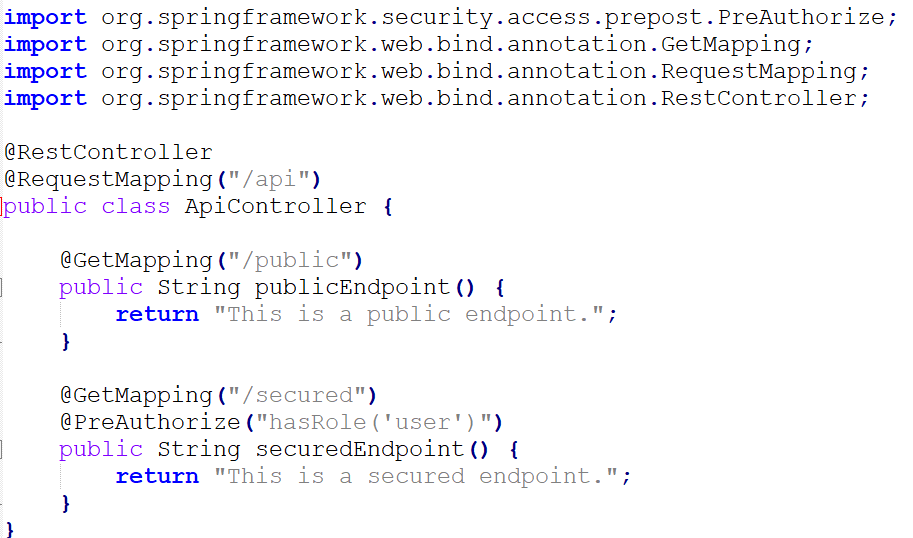
Best Practices for Integration
- Centralized Identity Management:
- We are using the Keycloak as the centralized identity provider to manage authentication and authorization for all our microservices and it will ensuring a consistent security model.
- Token Management:
- We are using here Keycloak’s token management features to handle access tokens as well as refresh tokens, and their lifecycles securely.
- Secure Communication:
- One thing here to note that we have to ensure secure communication between Keycloak and our microservices by using HTTPS and then also we have to configure secure transport layer protocols.
- User Federation:
- You have to Integrate various external identity providers and user databases with Keycloak to manage user identities across different systems.
- Monitor and Audit:
- And last thing is that you have to regularly monitor and audit the logs of authentication and authorization to detect and respond to potential security threats effectively.
Example of a complex Spring boot Kart & Payment micro services using key clock authentication?
The usage of e-commerce in all companies has been very much changed and transformed by most popular microservices architecture. With this architecture it would enable the development of scalable as well as maintainable complex apps and modular applications.
In this blog, I have explained in depth about keycloak with a complex example of building a Spring Boot-based kart and payment microservices system where I have leveraged the usage of Keycloak for authentication and authorization mechanisms. Below example will depict the integration of Keycloak to ensure secure communication between the microservices while maintaining a seamless user experience.
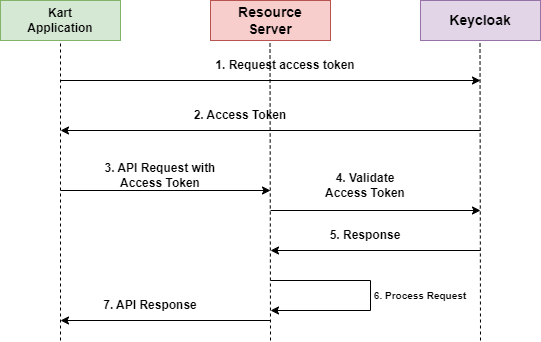
Overview of the Architecture
Our example system consists of two primary microservices:
- Aegis-Kart Service: It basically manages user carts including add and removal of kart items.
- Payment Service: It handles payment processing that includes payment creation/initiation and status tracking.
These microservices will be secured using Keycloak, an open-source identity and access management solution.
1. Setting Up Keycloak
Install and Start Keycloak
- Setup/Install Keycloak: Get the latest version from the Keycloak website.
- Start the Keycloak Server: Use the command

- Next start the keyclck server and to start the server.

- The part allows to run Keycloak on a port offset by 100 (defaultport is 8080, so this would be 8180).
Create a Realm
A realm in Keycloak is basically a tenant. It manages all major things like users/groups, credentials & roles.
- Browse keycloak n then navigate to the Keycloak admin console.
- Then create a new realm called:
ecommerce.
Create Clients
Clients represent the applications that interact with Keycloak.
- Create two clients: aegis-
kart-serviceandpayment-service. - We have to configure here each client with necessary redirect URIs and credentials.
Define Roles
Roles is nothing but it defines permissions for the clients.
- Create roles like
USERandADMINwithin theecommercerealm.
Create Users
- Add users and assign them roles like
USER.
2. Kart Service Setup
Create a Spring Boot Application
- Name the application:
kart-service.
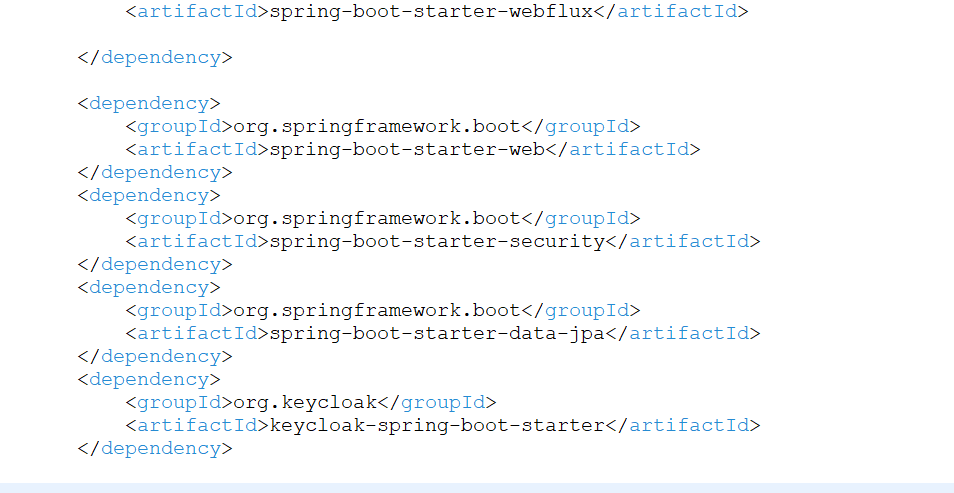
Add Dependencies
Add dependencies for Spring Web, Spring Security, Spring Data JPA, and Keycloak in pom.xml.
Configure Keycloak in application.properties
Implement Security Configuration

SecurityConfig class configures Spring Security to use Keycloak.
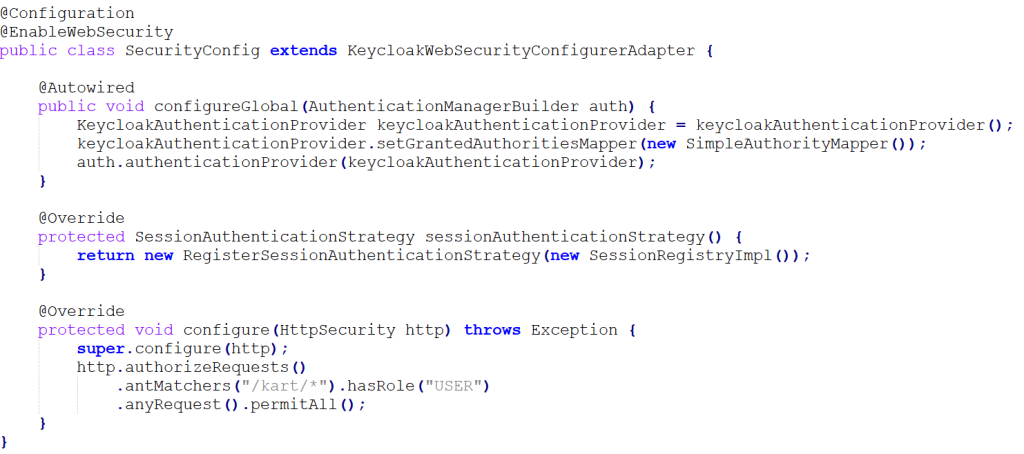
- KeycloakWebSecurityConfigurerAdapter: We are customizing here Spring Security configuration to integrate with Keycloak.
- configureGlobal: Registers Keycloak to act as authentication provider.
- sessionAuthenticationStrategy: provides/declarees the session authentication strategy.
- configure: Configures security rules. Here, /kart/* endpoints require the USER role.
Implement Kart Management Endpoints
KartController here is managing all the aegis- kart operations.
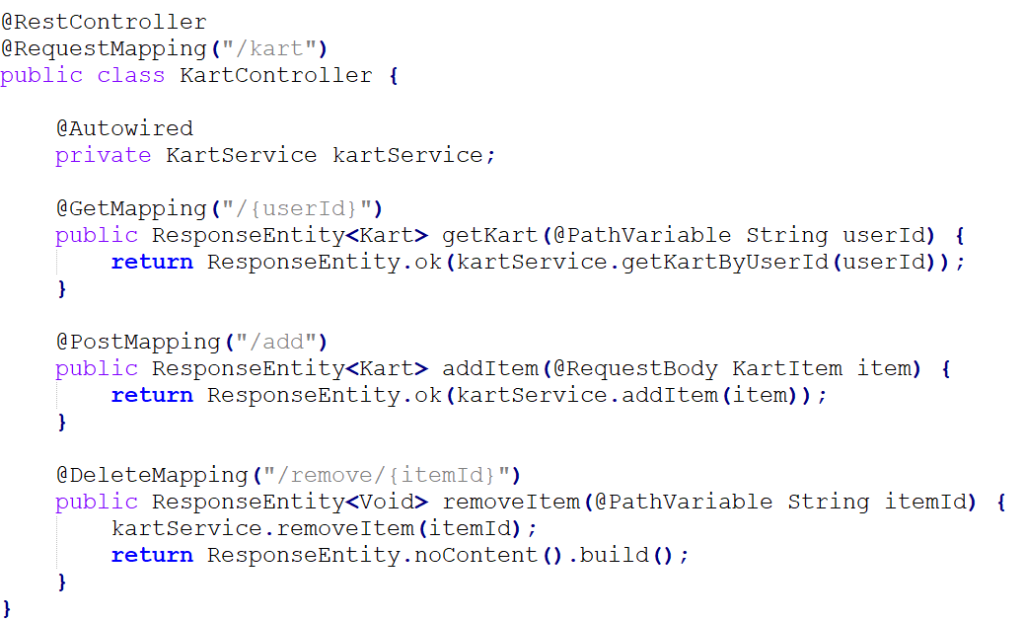
- @RestController: Indicates that this class is a controller.
- @RequestMapping(“/kart”): Base URL for kart endpoints.
- getKart: Retrieves the kart for a specific user.
- addItem: Adds an item to the kart.
- removeItem: Removes an item from the kart.
3. Payment Service Setup
Create a Spring Boot Application
Name the application: payment-service.
Add Dependencies
Add similar dependencies as the kart service.
Configure Keycloak in application.properties

Implement Security Configuration
Similar to the kart service but adjust endpoint access rules.
Implement Payment Processing Endpoints
PaymentController manages payment operations.
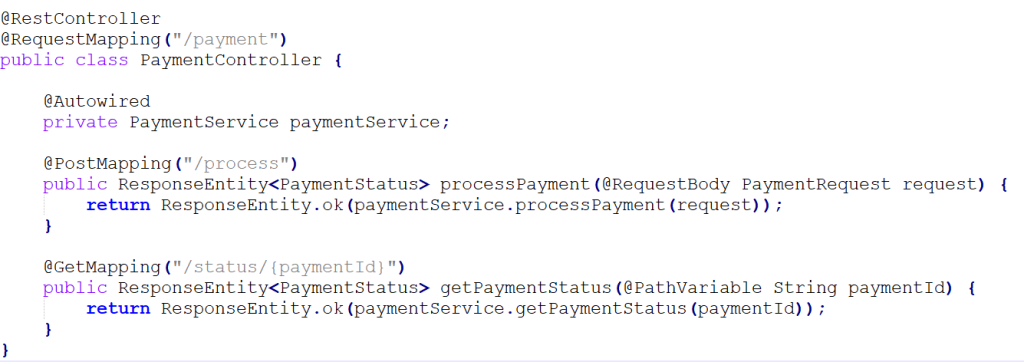
- @RestController: this makes for springboot IOC that this is a controller cls.
- @RequestMapping(“/payment”): This is base URL for payment endpoints.
- processPayment: It would process the payment request.
- getPaymentStatus: verifies and get the status of a payment
4. Testing the Integration
Start Keycloak Server
Ceck that if Keycloak is running or not.
Start Microservices
Run the aegis-kart-service and payment-service applications.
Authenticate and Authorize
- Get an access token first from Keycloak using user credentials.
- Next is to use the same token to access the secured endpoints of aegis-kart-service and payment-service.
Test Kart and Payment Workflows
- Add all items which user wants to the kart.
- Then initiate payment.
- After that verify the payment status.
Here in above example we are integrating Keycloak for authentication and authorization with springboot aligned to a Spring Boot based kart and payment microservices architecture and main thing is that we are ensuring here robust security and streamlined management of user identities and roles.
What are the advantages of key clock compared to another identity management authentication?
Identity management is always been critical thing for modern application development because it ensures secure authentication and authorization across all diverse systems. We have various identity management solutions available in market but Keycloak is very much popular because of its robust feature set and the ease of integration. I have explained the advantages of Keycloak compared to other identity management solutions.
Explore Vector Databases for smarter data handling
Advantages of Keycloak
Open-Source and Community-Driven
One of the key advantages of Keycloak is it is open-source. As it is open source Keycloak’s source code is freely available hence it allows companies to customize and extend its functionality to achieve custom requirements. Also one more thing is Keycloak maintains its software up-to-date with the latest security features.
Comprehensive Feature Set
Keycloak offers below range of features which are unique
- Single Sign-On (SSO): Keycloak actually enables SSO across various applications and hence the users does not need to log in separately for each application.
- Social Login: It supports integration with various social identity providers such as Google, Facebook, and Twitter etc and so that use can login with their accounts.
- Two-Factor Authentication (2FA): Keycloak provides in-house support for 2FA and it enhances the security of user accounts.
- User Federation: It can integrate with existing user databases such as LDAP and Active Directoryfor better user mgmt.
Extensibility and Customization
Keycloak’s architecture is really extensible as it allows developers to customize and extend its functionality. We can achieve below
Custom Authenticators: Developers can create custom authenticators to implement specific authentication mechanisms.
- Event Listeners: Keycloak provides event listeners which can trigger custom actions based on events with specific types we trigger for ex user login or logout.
- SPI (Service Provider Interface): Keycloak’s SPI can be leveraged for deep customization and integration with other systems.
Ease of Integration
Keycloak basically simplifies integration with applications through its client adapters and provides well documentation. There are client libraries it provides for various programming languages and frameworks such as Javan JavaScript and Node.js. These adapters can handle the complexity of authentication protocols for keycloak integration
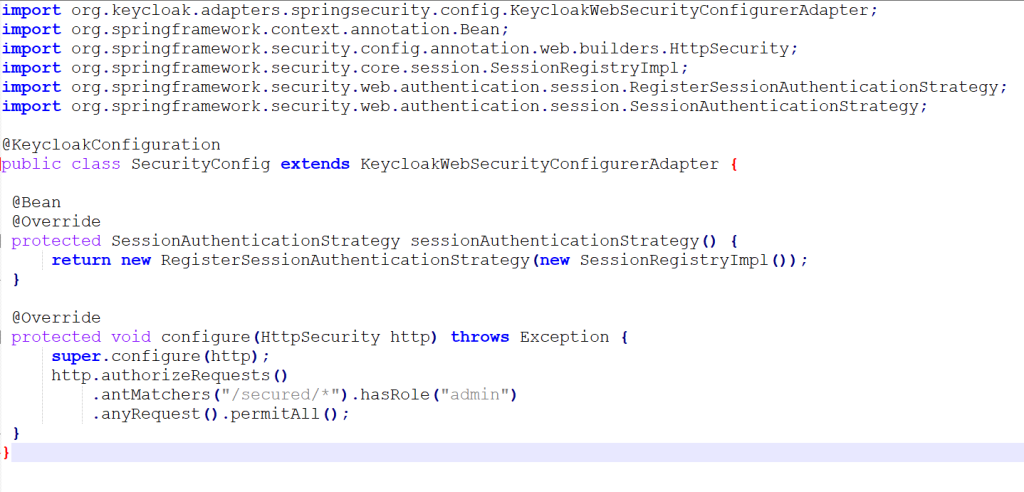
Example: Integrating Keycloak with a Spring Boot Application

Scalability and Performance
Keycloak can manage large-scale deployments so that provides flexibility for enterprise environments. It also supports clustering and load balancing and all microservices architecture features such as high availability and scalability. Keycloak’s performance optimizations through token caching and session management can manage high number of auth requests so better manageable even when heavy incoming traffics
Security and Compliance
Keycloak is inn with industry standard security practices and protocols. And it guarantees secure authentication and authorization. It undergoes regular security audits and updates to address if any new threats discovered. Also keycloak supports compliance with regulations such as GDPR wid user consent management and data privacy controls.
Administration and Management
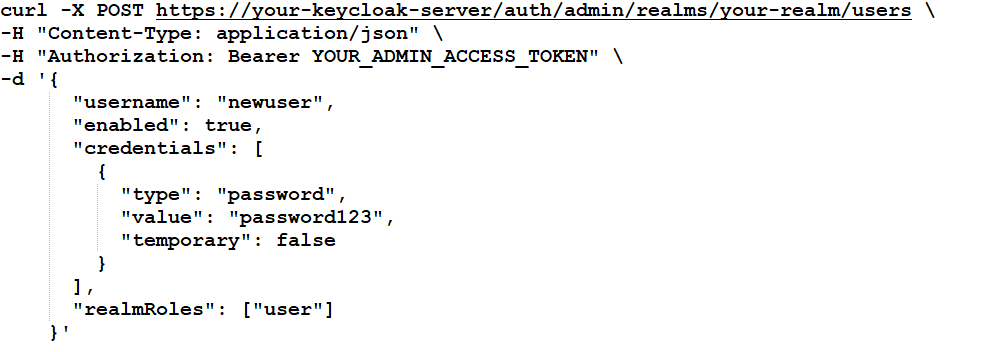
Keycloak provides a user-friendly web administrative console for managing realms users and user roles and clients. The console gives detailed insights view for user activities authentication events and the health check details. Also Keycloak provides REST API through which we can manage admin tasks in programmatic way
Example: Creating a New User Using Keycloak REST API
FAQs:
Implement seamless identity management integration in Spring Boot Microservice with keycloak
What is keycloak and explain its architecture?
- Ans: Keycloak is an open- Identity Management (IDM) is nothing but set of processes and technologies used to manage and secure the digital identities within an company IDM plays really a pivotal role in ensuring security and security compliance as well as efficiency.
Please read this blog for detailed architecture understanding
What are the advantages of key clock compared to another identity management authentication?
- Ans: Keycloak offers seamless SSO and it has built-in support for various protocols ( for example OAuth2, OpenID Connect and SAML) and also it provides user federation options with user-friendly admin console and i.e. customizable. It simplifies authentication and authorization processes and integrates well with modern applications.
How to integrate Identity Managament in Spring boot micro services using keycloak?
- Ans: To integrate Keycloak with Spring Boot microservices first you have to add the Keycloak Spring Boot adapter dependency in pom file and then configure the Keycloak settings in the application.properties or application.yml anything is fine and use the @EnableGlobalMethodSecurity annotation for method-level security. Configure the Keycloak client in the Keycloak admin console for your application. Please refer this blog for detail implementation.
How to configure keycloak for sprong boot microservices in Kubernetes?
- Ans: First you have to write deployment yaml for deploying Keycloak in a Kubernetes cluster using a Helm chart or Kubernetes manifests. The Configure environment variables and secrets for Keycloak in Kubernetes. Better use a ConfigMap to store the Keycloak configuration for Spring Boot microservices. Just make sure that proper network policies and service discovery are in place for secure communication between Keycloak and your microservices.
Please read this blog for detailed understanding on Keycloak deployment in a Kubernetes cluster
Interested in further exploring Kafka migration to Spring Boot 3.X? Read our comprehensive Tutorial : Kafka migration to Spring Boot 3.X


