Introduction:
In this blog, you will learn about how to balance consistency and Performance with strategic Use of caching, database partitioning, and Scheduler in spring Boot microservices:
In the trend of microservices, to optimize performance at the same time to maintain data consistency is really a major challenge. Spring Boot microservices also has same challenges. One effective way to achieve this balance between performance n data consistency during high traffic is through strategic caching.
Caching can reduce latency and decrease the load on our microservices as it stores frequently accessed data of the client. In this blog, I have explained the principles of caching in Spring Boot microservices with a complex real-time Java application development services example implementation.
Concepts of Caching in Microservices
Caching is a way used to store copies of frequently accessed data in a Cache (i.e. a temporary storage area, allowing for faster data retrieval. It actually reduces the need to repeatedly and frequently fetch the same data from the main data source and this process is really time-consuming and at the same time resource-intensive.
Major Benefits of Caching:
- Performance gets Improved: It reduces API response time by fetching data from the cache instead of making every time database or API calls.
- Load gets reduced: It reduces or decreases the load on the backend services as well as on databases side so that resources get less occupied and they can be used for other operations.
- Scalability gets enhanced: It increases the scalability of microservices as it can serve more requests with lower latency.
Diff. Types of Caching:
- In-Memory Caching: With this type of caching, it stores data in the RAM so that access time is fast. For examples; Ehcache and Caffeine.
- Distributed Caching: With this type of caching, data is stored across multiple nodes so that scalability is increased as well as fault tolerance is achieved. For Example :Redis and Hazelcast.
Achieving balance btw Consistency and Performance
See as you know caching increases performance nd as a result stale data is also increased if we are not managing these correctly. So at some point we have to maintain a balance between data consistency and performance and it should be must. Below are some strategies I have explained:
- Invalidate Cache: We have to always make sure that whatever cached data that should get invalidated or updated whenever the underlying data gets changed.
- Time-to-Live (TTL): One more thing is to set an cache expiration time for the cached data so that after that many intervals again fresh cache is populated.
- Read-Through Caching and Write-Through: With this configuration, cache gets synchronized with the data source during every read and write operations.
- Event-Driven Caching: Best practice is to leverage events to update or invalidate the cache data/entries whenever there is a change happens in the data source.
Real-Time Example Implementation for Strategic Caching with Spring Boot Microservice
I have explained here a real-time example of an e-commerce application where we need to optimize product catalog service performance using strategic caching.
1. Setting Up the Project
First basic step is to create a Spring Boot project with the required dependencies. Add below dependencies to your pom.xml:

2. Configuring Redis Cache
Configure Redis as the caching solution in application.properties:

3. Enabling Caching in Spring Boot
Enable caching by annotating the main application class:

4. Implementing Cacheable Methods
Use below annotations with @Cacheable, @CachePut, and @CacheEvict to manage caching behavior.
Service Class Example:
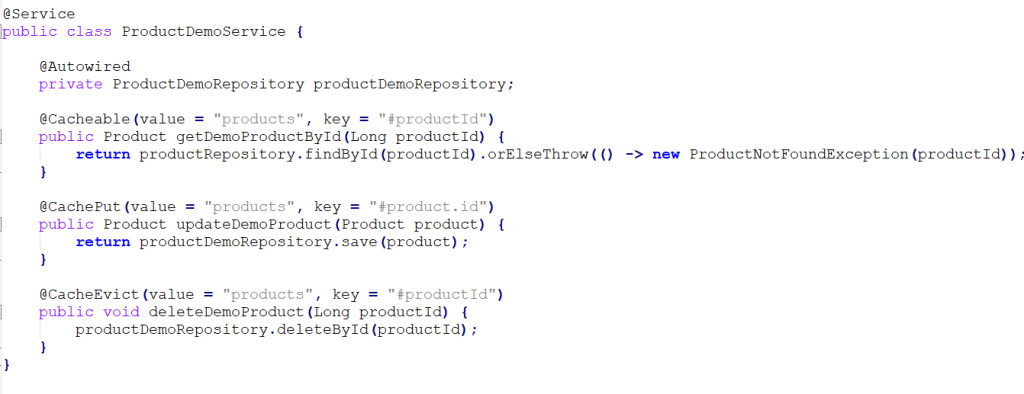
Explanation:
- @Cacheable: Caches the result of getDemoProductById method calls. If the method is called with the same productId, the cached value is returned.
- @CachePut: Updates the cache whenever a product is updated.
- @CacheEvict: Removes the product from the cache when it is deleted.
5. Managing Cache Consistency
To ensure cache consistency, configure cache invalidation and synchronization strategies:
Example of Cache Configuration:
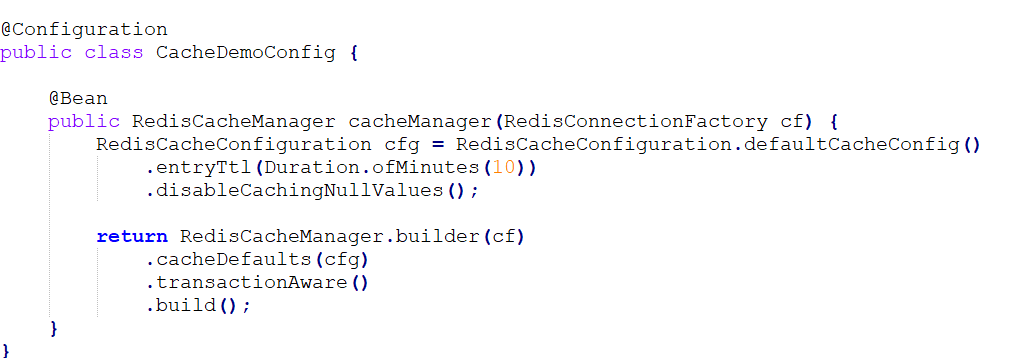
Explanation:
- TTL: Here for example , we are setting a time-to-live (TTL) of 10 minutes for cache entries and that’s why cached data remains fresh after every 10 minutues, cache is get repopulated.
- Caching Null Values is disabled: With this config, it would prevent null values from being cached.
6. Testing and Monitoring
Final thing is to test the above caching example implementation and verify that it really improves performance and maintains data consistency. For this testing, you can use Spring Boot Actuator and monitoring features with spring boot admin to monitor cache hits and cache evictions
Strategic caching in Spring Boot microservices really enhances performance. By implementing caching with Redis, which provides a robust caching framework, and using common annotations such as @Cacheable, @CachePut, and @CacheEvict, we can optimize your microservices. This approach is a crucial part of Microservices Development Services to ensure high efficiency and scalability.
What are Real-Time Caching Strategies for Spring Boot: How can we achieve Performance and Consistency in Microservices with real time example implementation:
What are Caching Strategies?
Before diving into the implementation, it’s essential to understand the different caching strategies available:
- Cache-aside or (Lazy Loading)
- Write-through
- Write-behind (Write-back)
- Read-through
- Distributed Caching
1. Cache-aside (Lazy Loading)
In this cache-aside pattern, the application first checks the cache for specific data. If lets say the data is not found then in caching terminology it is (cache miss), so then if a cache miss happens. it retrieves the data from the database and again populates it in the cache and then give response
2. Write-through
In this write-through way, data is first written to the cache and the database at same time. This makes data consistency between the cache and the database.
3. Write-behind (Write-back)
In thid write-behind approach, data is written to the cache first and then asynchronously it writes to the database. This improves write performance but problem is it requires proper handling of data loss scenarios.
4. Read-through
In this read-through approach, the cache is a proxy to the underlying data store. Whatever the read requests comes, that goes through the cache where data gets loaded from the database if it is not already cached.
5. Distributed Caching
In this distributed caching approach, it spreads the cache across multiple nodes/clusters to improve scalability and fault tolerance. Frequently used distributed caching solutions are examples: Redis , Hazelcast and Apache Ignite.
How to implement Cache-aside Strategy in Spring Boot Microservices
In this example I have explained about real-time implementation using the cache-aside apprach in a Spring Boot microservices architecture. I am using Redis here as our caching solution
Scenario :
Lets consider an example of microservices-based e-commerce application with two services: one is lets say Aegis Product Service and Inventory Service. The Product Service will fetch product details and the Inventory Service will manage product stock levels. I am going to implement caching for the Product Service to optimize performance while fetching product details.
Step-by-Step Implementation
Step 1: Setup Spring Boot Project
Start with basic springboot project and add the dependencies for Redis and Spring Cache. In pom file
Maven Dependency:

Step 2: Configure Redis
Configure Redis in application.properties:

Step 3: Enable Caching in Spring Boot
Then use annotation to enable caching in application by using @EnableCaching to our main application class:
@SpringBootApplication
@EnableCaching
public class ECommerceDemoApplication {
public static void main(String[] args) {
SpringApplication.run(ECommerceDemoApplication.class, args);
}
}
Step 4: Implement Caching in Product Service
Create the Product Pojo and repository:

Create the ProductService to handle caching:
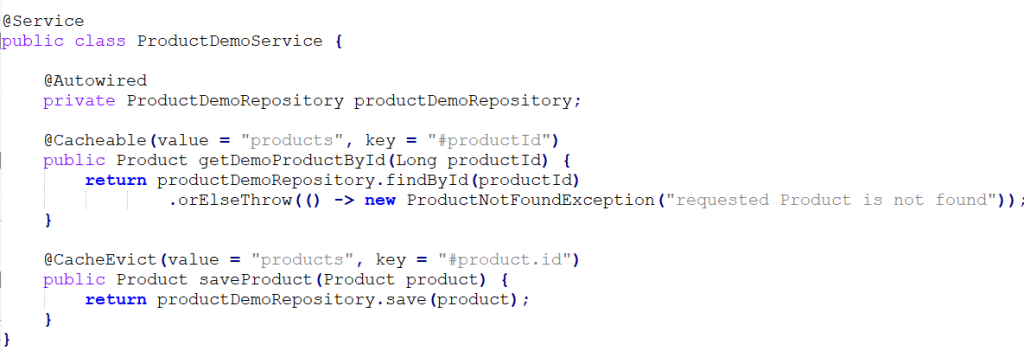
Step 5: Handle Cache Misses and Evicts
In the ProductService, use the @Cacheable annotation to load the product into the cache if it’s not already there (cache miss). Use the @CacheEvict annotation to remove outdated data from the cache when a product is updated.
Step 6: Create Controller for Product Service
Create a REST controller to expose the product service endpoints:

Step 7: Testing the Implementation
Verify n test the caching implementation by fetching product details. The first request will make a call to the database and cache the result. Then subsequent requests will be served from the cache, reducing latency and load on the database.
How to implement proper Database Partitioning for popular db postgress and mongo database in Spring Boot microservices ?
Database partitioning as the name implies that it a strategy for managing large datasets to enhance performance and also scalability will be achieved in applications. For microservices architectures usually data size can grow rapidly and, in this scenario, partitioning would really help to distribute the load and also query performance gets optimized with this and there by system stability is maintained.
In this blog, I have explained in details about how to implement database partitioning in an efficient way for PostgreSQL and MongoDB in Spring Boot microservices with a real time example impl.
What is Database Partitioning?
Database partitioning means it is technique of dividing a large table into smaller data which can be manageable and these smaller data is known as partitions. Each partition can be separately managed and accessed independently. And these data together form a complete larger dataset. We can implement partitioning in several ways:
- Sharding /Horizontal Partitioning: In this process, rows of a table are distributed across multiple tables based on a shard key.
- Vertical Partitioning: In this type, table is split into smaller tables with lesser columns.
- Range Partitioning: In this type,data are divided based on ranges of values.
- List Partitioning: In this type, data gets divided based on some predefined list of values.
- Hash Partitioning: In this type, data is distributed using a hash function on a partition key.
Benefits of Partitioning
- Performance boost: Queries will run faster if datasets are smaller.
- Scalability: We can easily add new partition to scale up
- Maintenance: Simplifies backup, restore, and indexing operations.
- Data Management: Facilitates data archival and purging.
How to implement Partitioning in PostgreSQL
PostgreSQL supports all types portioning such as range, list and hash partitioning by default.
I’ve explained step-by-step to implementing range partitioning in PostgreSQL in a Spring Boot microservices environment.
Step 1: Define the Partitioning Strategy
First find the table and the partition key. Fore xample, partition an orders table by order_date.
Step 2: Create the Parent Table
Here creating a parent table without data but with all required columns.

Step 3: Create Partitioned Tables
Here I am creating child tables for every range.

Step 4: Configure Spring Boot Application
In your Spring Boot application, configure the data source and enable JPA:
application.properties:

Entity Class:
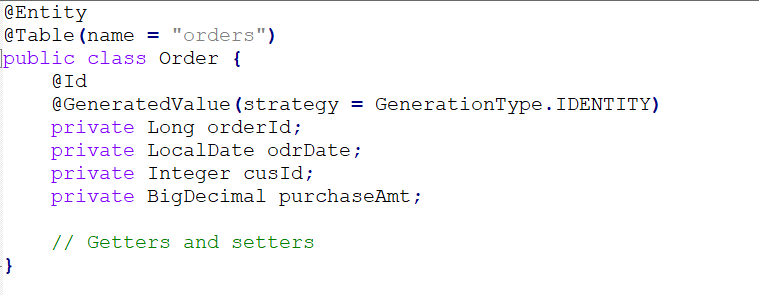
Repository Interface:
public interface OrderDemoRepository extends JpaRepository {
// Custom query methods
}
Implementing Partitioning in MongoDB
For horizontal partitioning, MongoDB uses sharding
Step 1: Enable Sharding
We’ve to enable sharding on the database.
sh.enableSharding(“aegisdb”)
Step 2: Then need to Shard Key and Shard Collection
Create a shard key and shard the collection.
db.orders.createIndex({ odrDate: 1 })
sh.shardCollection(“aegisdb.orders”, { odrDate: 1 })
Step 3: Configure Spring Boot Application
Configure MongoDB settings in your Spring Boot application.
application.properties:

Entity Class:
Same as Order Class
Repository Interface:
publicinterfaceOrderDemoRepositoryextendsMongoRepository<Order, String> {
// Custom query methods
}How to achieve partitioning in an IoT Microservice
Scenario: An IoT application for example it collects and processes sensor data from various iot devices. The application uses PostgreSQL for storing transactional data and MongoDB for storing historical sensor data readings.
Effective partitioning strategies means it should manage the large inflow of data and then it should give optimal performance.
1. Setting Up Spring Boot Project:
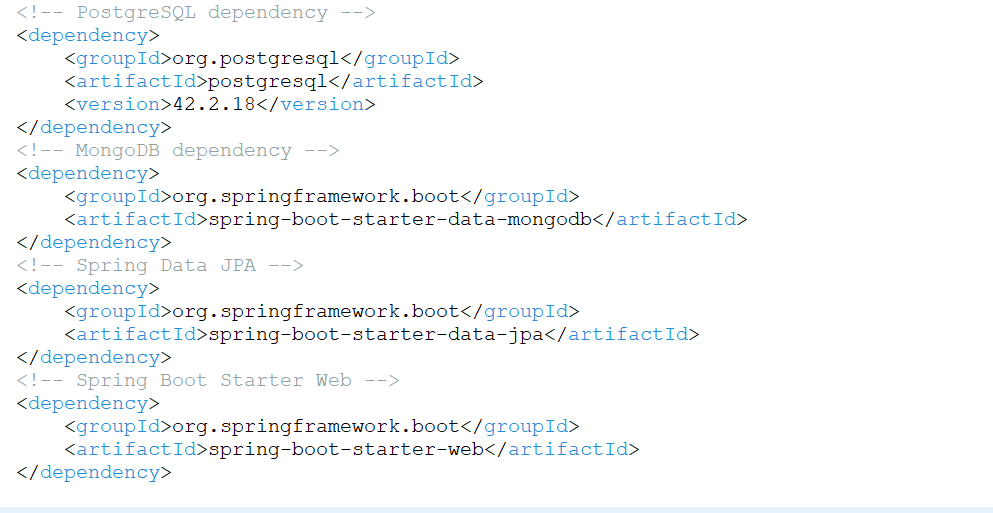
In your spring boot project, add dependencies in pom for PostgreSQL, MongoDB, and Spring Data JPA.
pom.xml:
2. PostgreSQL Partitioning Configuration:
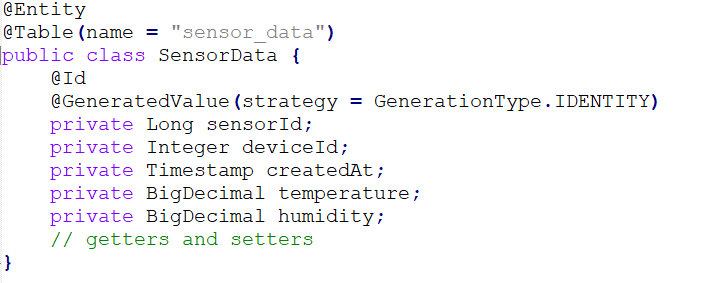
Here I am creating partitioned sensor_data table in PostgreSQL and here I am using range partitioning based on created_at timestamps.

SensorData Pojo:
SensorData Repository:
java
public interface SensorDataDemoRepository extends JpaRepository {
}
3. MongoDB Sharding Configuration:
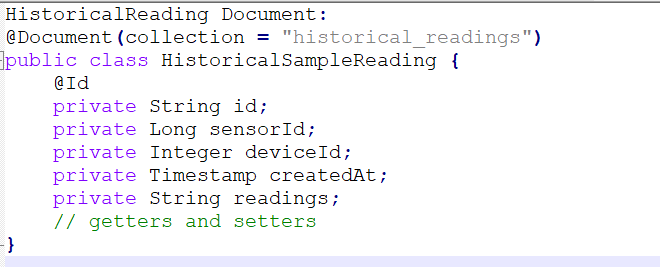
Enable sharding for the historical_readings collection in MongoDB
Application Configuration:

HistoricalReading Document:
HistoricalReading Repository:
publicinterfaceHistoricalSampleReadingRepositoryextendsMongoRepository<HistoricalSampleReading, String> {
}4. Service Layer Implementation:
Implement a service layer to handle sensor data processing and storage.
SensorService:

5. Controller Layer Implementation:
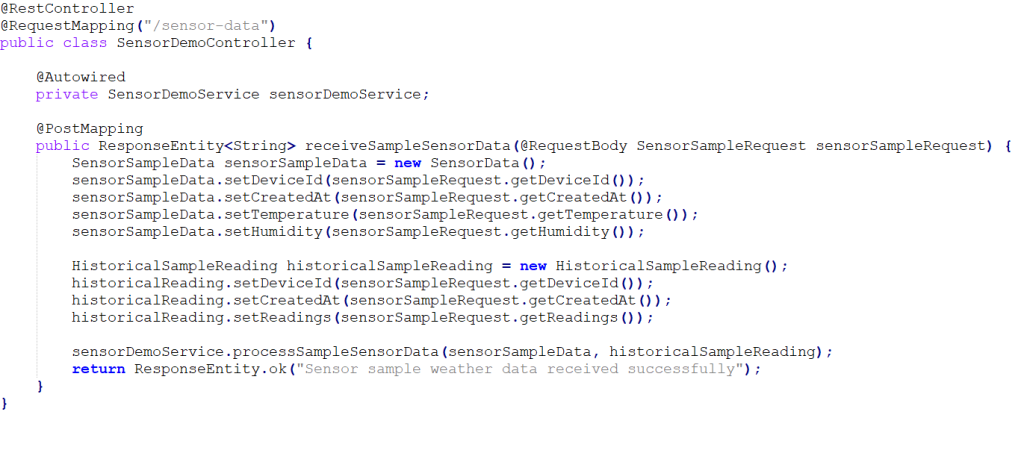
Create a controller to handle incoming sensor data.
SensorController:
SensorRequest DTO:
public class SensorSampleRequest {
private Integer deviceId;
private Timestamp createdAt;
private BigDecimal temp;
private BigDecimal humid;
private String readings;
// getters and setters
}
How to Enhance Performance and Consistency in microservices through Strategic Database Partitioning?
Understanding Database Partitioning
Database partitioning as I already mentioned it divides a large database into smaller individual manageable segments called partitions. Each partition can be scaled independently. And we can apply partitioning based on various criteria for ex wr.t range, list, hash or composite keys, depending on the use case.
Example implementation E-Commerce Application
I have explained here about an e-commerce application where multiple microservices serves different purposes including orders, inventory and user/customer data. The app may face performance bottlenecks and consistency issues with to the large volume of input data and high transaction rates.
Here, I have Implemented database partitioning which can solve these issues where we are going to distribute the data across multiple partitions.
Scenarios:
- Application: e-comm platform with microservices for orders, inventory and user/customer management.
- Challenge: Performance issues and consistency issues with a monolithic database.
1. Identifying Partitioning Strategy
For our example, we’ll use range partitioning based on order IDs. This would be suitable for our requirement with large datasets where queries are triggered within specific ranges.
Partitioning Scheme:
- Orders Table: Partition based on order ID ranges.
- Orders with IDs from 1 to 1,000,00 go into
orders_part_1. We can increase this to more range also depending upon the volume of input request - Orders with IDs from 1,000,01 to 2,000,00 go into
orders_part_2, and so on.
- Orders with IDs from 1 to 1,000,00 go into
2. Database Schema Setup
Create the Base Table and Partitions:
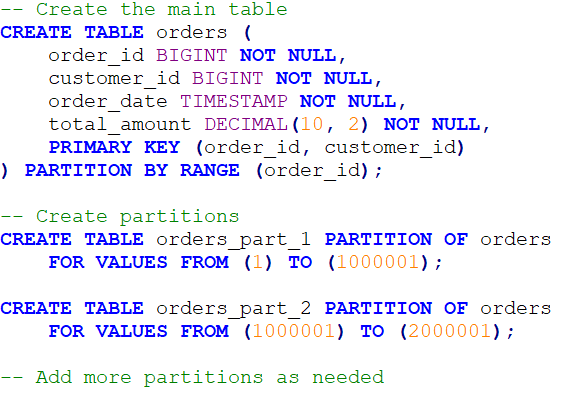
Explanation:
- Base Table:
orderstable is defined withorder_idas the partitioning key. - Partitions: Diff ranges of
order_idare assigned to different partitions. This way it would help in distributing the data and also query performance will be optimized.
3. Spring Boot Configuration
Update the application.properties for Database Connection:

Configure Entity and Repository:
Here using the Order entity as already explained above and repository in Spring Boot.
@Repository
public interface OrderDemoRepository extends JpaRepository {
List findByCustomerId(Long customerId);
}
Explanation:
• Entity Configuration: The Order pojo is mapped to the orders table with partitioning.
• Repository: OrderRepository extends JpaRepository for CRUD ops.
4. Implementing Service Layer
Order Service Implementation:
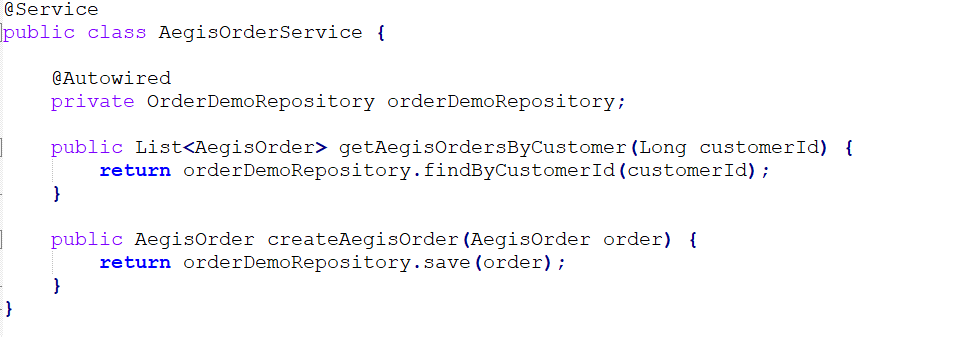
Explanation:
- Service Layer: This has service methods to interact with the
Orderrepository mainly for query execution and data creation.
5. Handling Consistency
To ensure consistency across partitions in distributed systems we’ve to consider different strategies:
- Transactions: Use distributed transactions and check that whatever database you are using that must support partition-level transactions.
- Data Integrity: Implement custom validation and impose integrity checks to handle data across partitions.
Example of Consistency Handling:
Explanation:
- Transactional Annotation: Here one thing we have to check that the
createOrdermethod is executed within a transaction so that we can maintain data integrity across partitions.
6. Monitoring and Maintenance
you need to monitor partition performance and adjust partitioning strategy as data size increases. Then use any database monitoring tools to track performance metrics and can verify if any potential issues.
Monitoring Example:

Explanation:
- Monitoring Component: Monitors database performance, helping to identify and address potential bottlenecks.
How to optimize Consistency and Performance in Spring Boot Microservices with Strategic Scheduling example implementation:
In this blog, I have explained how to optimize consistency and performance in Spring Boot microservices using strategic scheduling. I’ve explained about a real-time complex example with step-by-step process on how to implement these strategies.
Realtime Example Implementation:
Task Overview:
Take an example of a retail e-commerce platform where multiple microservices handle various functions as I have already taken same example for other features explanation such as inventory management order process svc and user notifications. One critical challenge is to manage inventory updates and then to send notifications in an effective way that will maintain consistency across microservices
Goal:
Implement a strategic scheduling mechanism to:
- Ensure Consistency: Maintain data integrity across all our product order and inventory micro services.
- Optimize the Performance: Here we have to improve the performance of scheduled tasks without impacting the overall api responsiveness.
In details Implementation
1. Setting Up the Spring Boot Project
Include necessary dependencies in your project for scheduling and data management.
pom.xml (Maven Example):
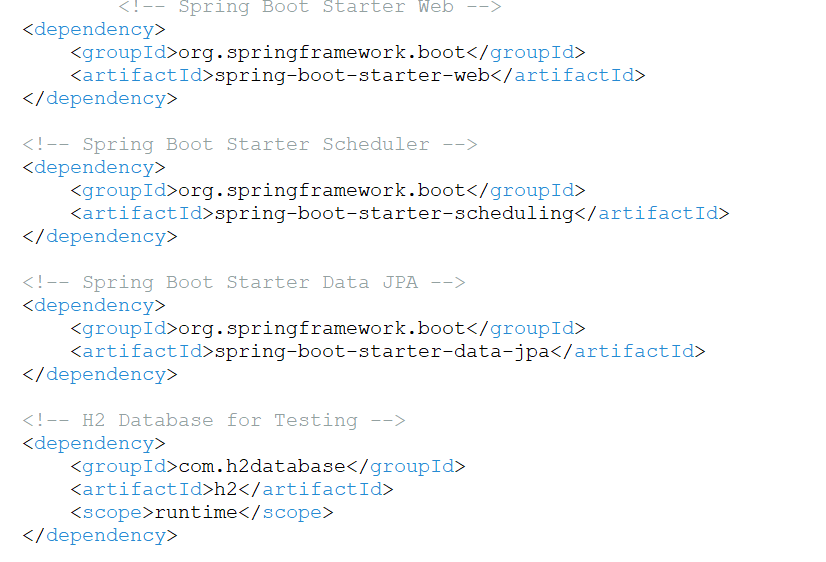
2. Configure Scheduling
Next step is to enable scheduling in our Spring Boot main application and then we have to define a scheduler for periodic tasks.
Application.java:

Explanation:
@EnableScheduling: This annotation is to enable the scheduler / tasks, and allows to define scheduling related methods that execute at specific intervals.
3. Implementing a Scheduler for Inventory Updates
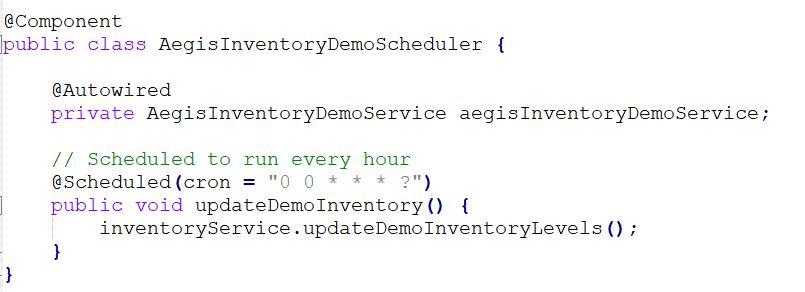
Here I have created a scheduler to periodically update inventory data so that we can maintain consistency across services.
InventoryScheduler.java:
Explanation:
@Scheduled(cron = "0 0 * * * ?"): This configuration makes the method to run every hour at the top of the hour. We can change the cron expression as needed for your use case.updateInventoryLevels: This method inInventoryServiceupdates inventory data.
4. Implementing the Inventory Service
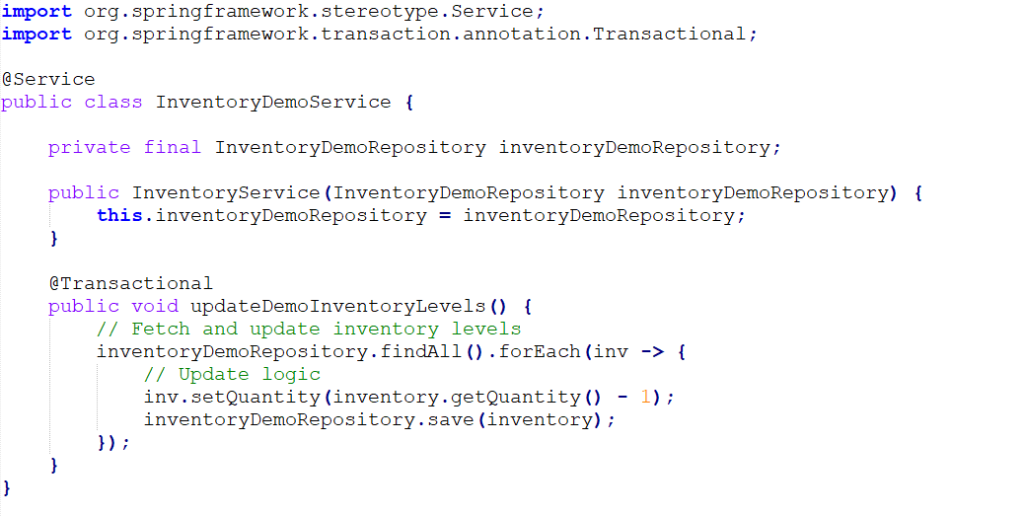
I have created the InventoryService to manage inventory updates and ensure consistency.
InventoryService.java:
Explanation:
@Transactional: We have to be careful here as we need to verify that inventory updates are executed within a transaction for data consistency even if any failures happens.inventoryRepository.save(inventory): This will save the updated inventory data to the database.
5. Implementing a Scheduler for User Notifications
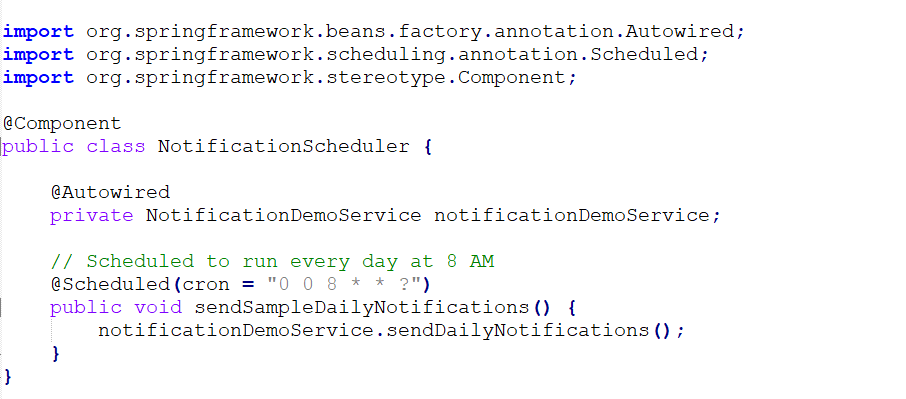
I have defined a scheduler for sending user notifications with a scheduled cron job
NotificationScheduler.java:
Explanation:
@Scheduled(cron = "0 0 8 * * ?"): With this config, the method will be invoked daily at 8 AM, balancing the load on the system.
6. Implementing the Notification Service
I have created the NotificationService to handle the notification logic.
NotificationService.java:

Explanation:
sendSampleDailyNotifications: This has the logic for sending notifications. This also can be leveraged to fetche user data and then send emails or push notifications.
7. Monitoring and Performance Tuning
Now we have to monitor scheduled tasks and then can change the scheduling strategy based on performance metrics.
Monitoring:
- We can leverage Actuator and can impose custom monitoring solutions where we can track the execution of scheduled tasks.
- check metrics to find execution time success/failure rates
What are Real-Time Strategies for Balancing Performance and Consistency usung Batch Processing in microservices?
In your microservices architecture, how can you balance performance and consistency and it is really a challenge. Batch processing can be imposed here as it is strategy to address this issue specifically consider scenarios where we requires high-throughput operations and where data integrity should be must.
In this blog, I have clearly explained with example where we can achieve performance and consistency using batch processing in Spring Boot microservices
Realtime Example Implementation:
Scenario:
Again, let’s take same example of an e-commerce app where handle high volumes of order processing and inventory updates are required. The application consists of several microservices such as Order Service and an Inventory Service. I have explained batch processing for managing inventory updates when order is placed.
1. Add Dependency
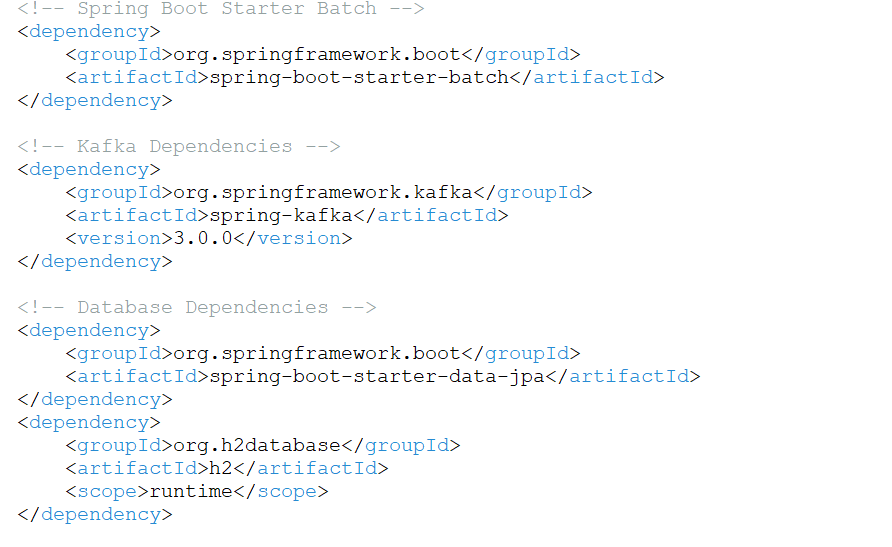
I have created spring boot project with dependencies for batch processing with Kafka and database.
Maven Configuration:
Explanation:
spring-boot-starter-batch: it is used for the batch processing capabilities.spring-kafka: it is used to integrate with Kafka for event-driven processing.spring-boot-starter-data-jpaandh2: provides database access so that data can be persisted and managed.
2. Defining the Batch Processing Job
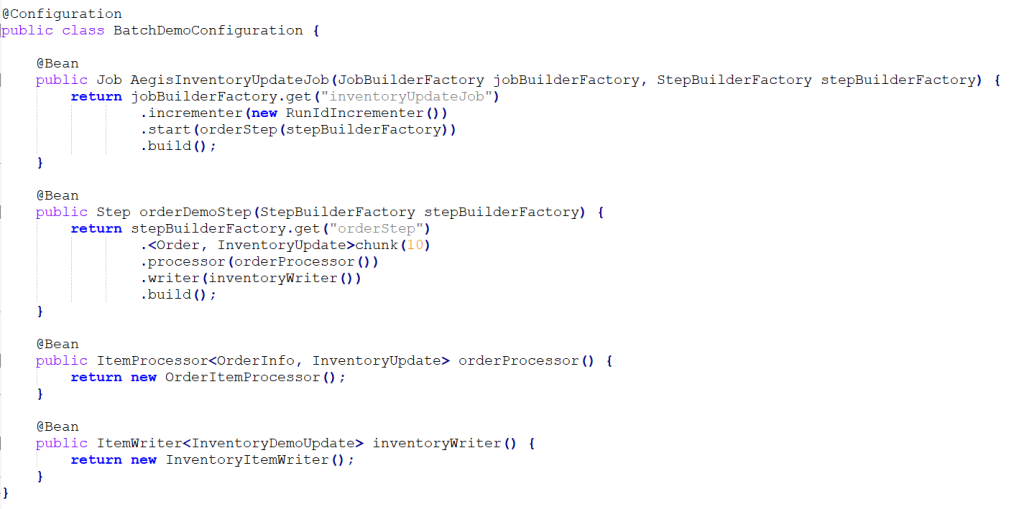
Batch processing in Spring Boot is achieved using Job and Step configurations. I have defiend a job that would process the orders in batches and then it will update inventory accordingly.
Job Configuration:
Explanation:
inventoryUpdateJob: Defines a job namedinventoryUpdateJob, which increments the run ID on each execution.orderStep: Creates a step that processes orders in chunks of 10.orderProcessor: Converts orders into inventory updates.inventoryWriter: Writes inventory updates to the database.
3. Implementing the Processor and Writer
OrderItemProcessor:

Explanation:
OrderSampleItemProcessor: This will convertOrderobjs intoInventoryUpdateobjects so that inventory quantities can be adjusted based on order data.
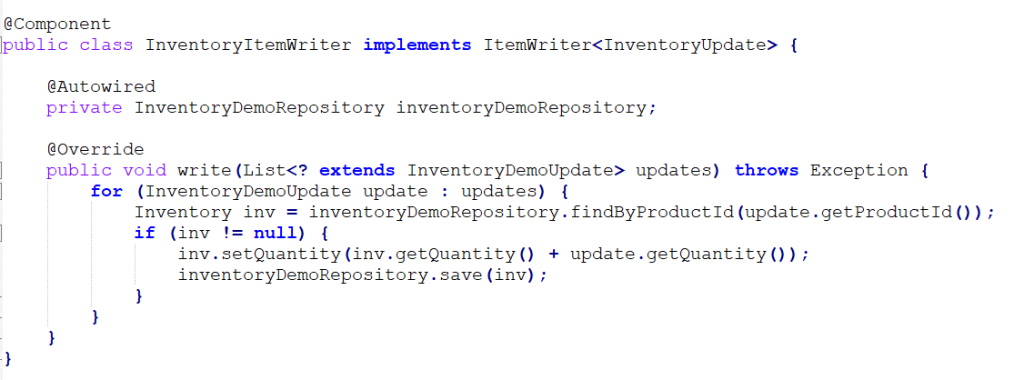
InventoryItemWriter:
Explanation:
InventoryItemWriter: this updates the inventory in the database based on the batch ofInventoryUpdateobj. It retrieves current inventory stock level & then will apply the updates and saves the changes.
4. Integrating Kafka for Asynchronous Processing
To enhance performance, I have used Kafka to handle asynchronous inventory updates.
Kafka Producer Configuration:

Explanation:
KafkaProducerConfig: This config class has Kafka producer properties where we can sendInventoryUpdatemessages.
Updating InventoryItemWriter to Send Messages to Kafka:

Explanation:
InventoryItemWriter: This is used to send inventory updates as Kafka payloads instead of directly writing to the database. This approach really decouples the processing and storage where system’s scalability is increased and system will become resilient.
5. Handling Kafka Messages in a Consumer Service
I have created a Kafka consumer to process inventory updates asynchronously:
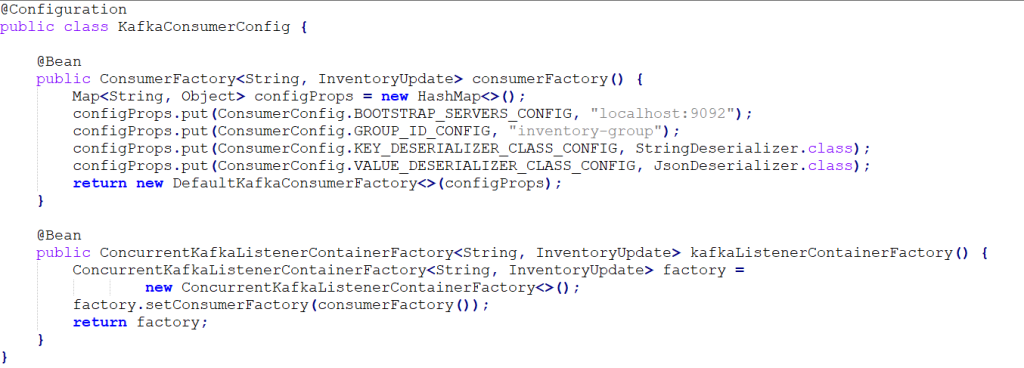
Kafka Consumer Configuration:
Explanation:
KafkaConsumerConfig: This configuration will make Kafka consumer to readInventoryUpdatemessages from theinventory-updatestopic.
InventoryUpdateConsumer:

Explanation:
InventoryUpdateConsumer: This consumer will listen to theinventory-updatestopic and processes incomingInventoryUpdatemessages so that inventory levels update will happen asynchronously.
How to achieve Performance and Consistency in Spring Boot Microservices with use of Scheduling and Batch Processing?
Here, I have explained with an example how to implement scheduling and batch processing within a single project using Spring boot microservices. Explained real-time scenario of a financial services application where showed examples of transactions and reporting.
Example impl for Financial Transaction Processing App
In a financial services application, primary thing is to handle periodic tasks consists of generating daily transaction reports and then processing transactions in large batches. I have used Spring Boot’s scheduling and batch processing features.
Project goal
- Daily Transaction Reporting: The app will generate and email daily transaction reports in a specified time.
- Processing the Transaction in batches: It will process a large batch of financial transactions.
Step-by-Step Implementation
1. Basic Setup
Basic setup you will be aware about to create a Spring Boot project and then add necessary maven/gradle dependencies for scheduling and batch packages.
build.gradle for Gradle:

2. Batch Processing Configuration
Spring Batch here helps in processing large volumes of data. I have configured a simple batch job to handle transaction reconciliation.
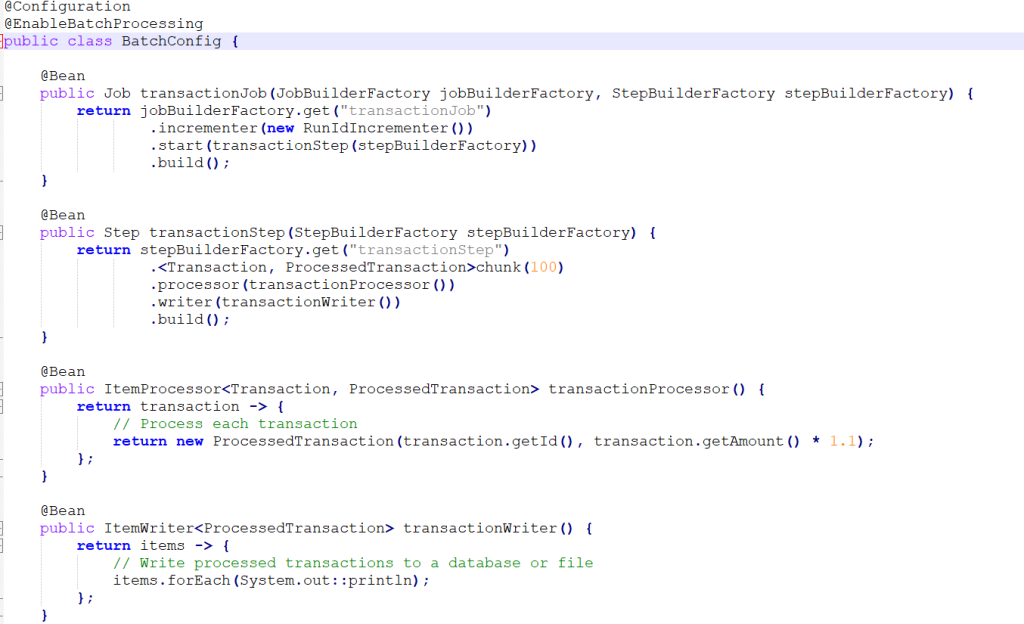
Batch Job Configuration:
Explanation:
- @EnableBatchProcessing: This annotation will enable Spring Batch features.
- Job and Step Beans: We have to create a job and define the steps for processing transactions. A job actually consists of one or more steps and each step denotes a chunk of data.
- ItemProcessor: It will process each Transaction object to create a ProcessedTransaction.
- ItemWriter: This helps in writing the processed transactions to the specified target output .
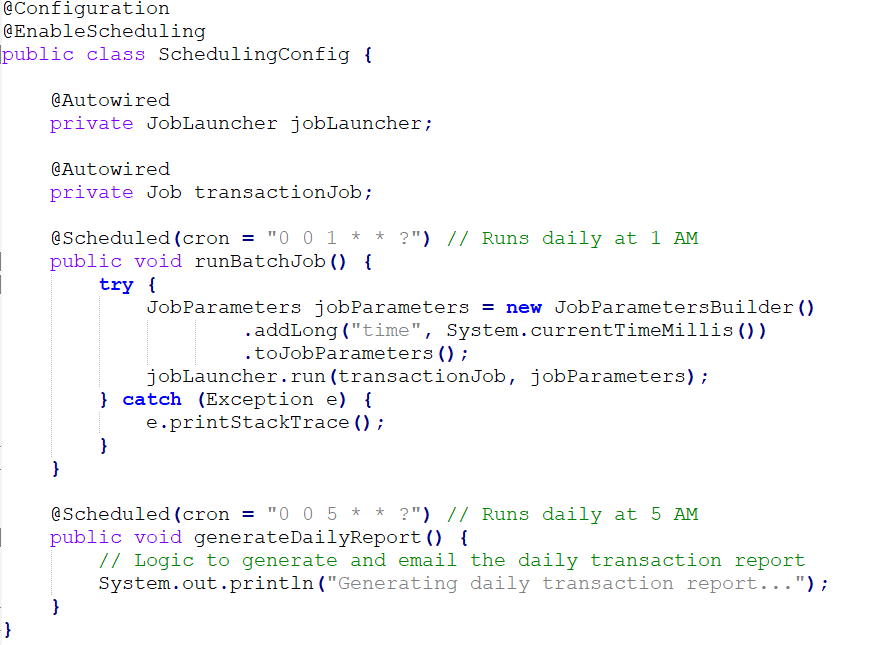
3. Scheduling Configuration
I’ve used springboot scheduling features to trigger the batch job and other periodic tasks like generating reports.
Scheduling Configuration:
4. Transactional Consistency
In this below class, I am ensuring that consistency is achieved by specifying transactional boundaries within the configuration class for batch processing. Spring Batch config is used here to provide in-built support to manage transactions across job steps.
Transactional Management:
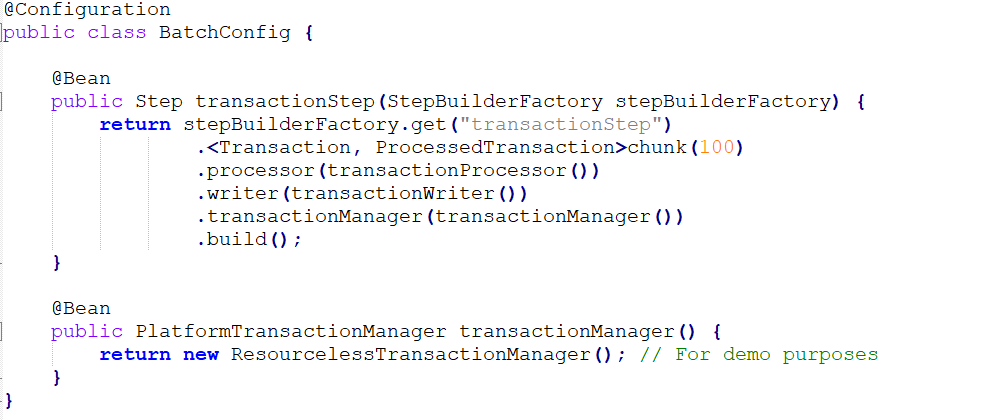
Explanation:
- transactionManager(): We have to create the transaction manager here for managing transactions during the activity for batch processing. For real time apps, we have to configure proper transaction manager.
5. Error Handling and Retries
I have implemented error handling and retry mechanisms here which is really required to manage failures at time of batch processing.
Error Handling and Retry Configuration:

Explanation:
- faultTolerant(): for enabling fault tolerance for the step.
- retryLimit(3): this sets the configuration to retry up to 3 times on exceptions.
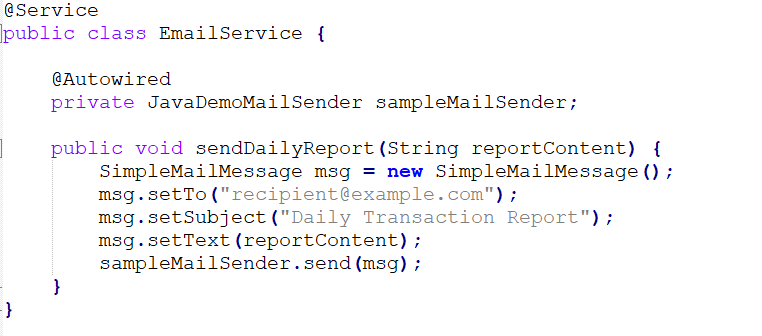
6. Email Notification for Reports
This configuration is used to send email notifications for daily reports.
Email Configuration:
application.properties:

Email Service:
Explanation:
- JavaMailSender: Used to send emails.
- sendDailyReport(): Sends an email with the report content.
Tutorial : Kafka migration to Spring Boot
Conclusion:
The example I explained above for performance and consistency implementation in any microservices based applications in real-time must use a combination of scheduling and batch processing. This would be very much helpful for large-scale data processing and then scheduling tasks for periodic operations and transactional consistency will be achieved
Upgrade Java search capabilities with Vector Databases


